Giving a facelift to your towel warmer is like revamping an old rusty shelf: with the right tools and approach, you can bring the entire bathroom back to life. Many think you have to buy new when the towel warmer starts showing signs of wear, but believe me, a few hours of well-executed DIY is more than enough! When you embark on this type of project, it’s best to follow certain essential steps, avoid common mistakes, and above all choose the right products to ensure the paint holds up despite the heat.
This article will explain step by step how to successfully carry out your towel warmer renovation, from stripping to finishing. You’ll see that painting a towel warmer is nothing insurmountable, as long as you pay attention to surface preparation and the choice of suitable paint. So, get your apron and gloves ready, let’s go!
📋 📋 The essentials at a glance: Personally, I consider that refurbishing this heating appliance remains an excellent solution to modernize a wet room, showing perfect durability of more than 5 years if a specific high-temperature resin is applied. In my opinion, using a standard wall paint makes the mistake of accelerating peeling from the first use. A careful job guarantees you a smooth finish, resistant to condensation and perfectly harmonized with your decor.
Why renovate your towel warmer?
👍 Strengths
- Very low cost allowing a modern makeover at minimal expense.
- Avoids heavy plumbing work and draining the water circuit.
- Wide choice of shades to harmonize the appliance with the tiles.
🔻 Limits
- Requires meticulous preparation and perfect degreasing under penalty of rejection.
- Does not improve the energy performance of an outdated appliance.
Constant humidity, splashes, and even fingerprints can eventually dull or peel the towel warmer paint. Nothing worse than stepping out of a hot shower and seeing your towels hanging on an appliance that looks shabby! Over time, the factory-applied radiator paint begins to deteriorate, so a renovation becomes necessary to extend its lifespan without replacing everything.
🗣️ My experience: Last April, I renovated a white tubular radiator yellowed by time in a tenant’s bathroom for a supply cost of only 18 euros. The appliance had some surface rust spots near the lower welds. The big practical lesson I learned from this project is that brushing with a wire brush followed by applying a white anti-rust primer definitively blocks corrosion under the final lacquer.
Another often neglected point concerns heat protection. Ordinary paints do not hold on this type of surface: they blister or yellow quickly. This is the main reason why it is necessary to rigorously select the type of paint and follow every preparation step.
To go deeper, I recommend our complete guide to know which chandelier to choose according to the decoration and room layout which complements well the customization of your spaces. Our tutorial on how to lacquer a piece of furniture also provides useful tips if you like smooth and shiny finishes. And to go even further, our file on the application of Seigneurie paint offers interesting insight on the choice of high-end lacquers.
Surface preparation: what does it mean to clean and sand properly?
The success of the project relies above all on surface preparation. I remember a friend who had simply wiped his towel warmer quickly with a cloth before applying the color of his choice. Result: six months later, the paint was peeling and looked pitiful… The moral? Never rush this crucial step when you want to ensure adhesion and durability.
Deep cleaning: first priority
Any dirt, grease, or soap residue prevents the paint from properly adhering. Simply put, when cleaning the surface, you need to use degreasing soapy water. Pay special attention to areas where dust accumulates between the tubes or behind the towel warmer. Rinse and dry carefully before moving on.
Today, there are special degreasing wipes, but the old duo of dish soap + sponge remains effective. If you come across lime scale marks, prepare a small mixture of white vinegar/hot water: it gets rid of stubborn deposits!
Careful sanding: the secret to good adhesion
Once dry, equip yourself with abrasive paper (grit 120 to 180). The goal is not to damage the metal but to slightly dull the surface. It is this roughness that will allow the undercoat or special radiator paint to hold well. Don’t forget the curves, the corners, and visually check that no shiny areas remain.
Remember to dust off afterwards, otherwise you risk finding these particles trapped under the future coat! A damp cloth or a compressed air blower works perfectly.
Choosing a suitable undercoat and paint for a towel warmer
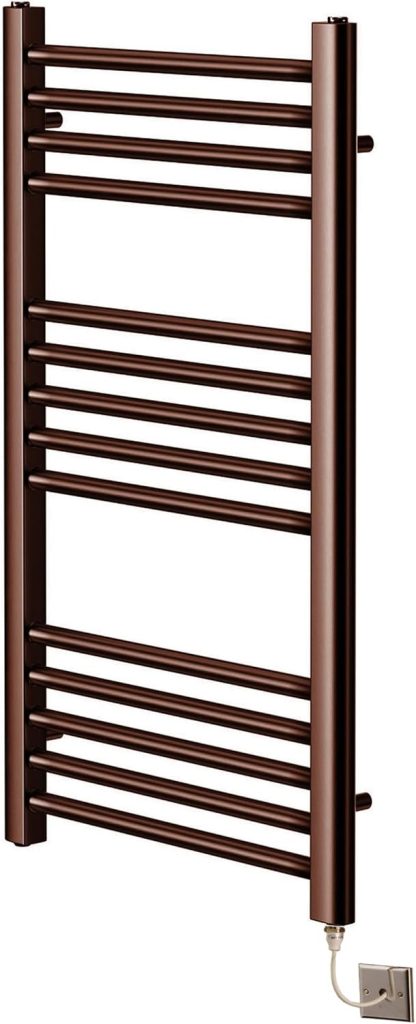
The DIY dilemma: which product to choose between epoxy resin and special radiator paint? Here, it is mainly about ensuring heat protection and fighting adhesion problems. Forget standard paints for walls or wood, they will never withstand heating cycles.
Undercoat or primer: is there a difference?
Whether you call it undercoat or primer, it is the same principle: to create a stable, homogeneous, and insulating base to receive the final paint. On bare or sanded metal, opt for a special undercoat for ferrous metals — it will also prevent rust formation under the future paint.
Warning, some radiator paints already include a primer, which is often indicated on the packaging. But for a towel warmer in poor condition or old, it’s better to play it safe and apply two thin coats of primer yourself before any coloring.
Paint: effective options
Here, you have three main possibilities:
- Epoxy resin: maximum heat resistance, waterproof to moisture. Demanding application, ultra-durable result.
- Special radiator paint: easy to apply with a brush or roller. Specifically designed to withstand regular heating without blistering or yellowing.
- Hammerite: rust-proof paint with strong coverage, often chosen for its robustness on metal. Perfect for towel warmer renovation provided the surface is well prepared.
| Type of paint | Heat resistance | Application method | Complete drying required |
|---|---|---|---|
| Special radiator aerosol | Up to 120 degrees | Cross spraying | 24 hours before turning on |
| High-temperature alkyd lacquer | Up to 90 degrees | Angled brush and smoothing roller | 48 hours (strong odor) |
| Acrylic radiator resin | Up to 80 degrees | Detail brush | 24 hours (odorless) |
| Two-component epoxy paint | Over 150 degrees | Paint gun | 72 hours (ultra resistant) |
For the application method, feel free to prefer the aerosol (spray paint) on complex tubular models or simply the brush/roller on flat surfaces.
Don’t hesitate to ask for advice in store and especially check the maximum temperature tolerated by the paint: some products stop at 60°C, others go over 100°C!
document.addEventListener(‘DOMContentLoaded’, () => { if (window.Alpine || window._alpLd) return; window._alpLd = true; const s = document.createElement(‘script’); s.src = ‘https://cdn.jsdelivr.net/npm/alpinejs@3.x.x/dist/cdn.min.js’; s.defer = true; document.head.appendChild(s); });Painting steps: application and drying to avoid adhesion problems
You have chosen your paint and ensured impeccable surface preparation? Perfect. Let’s get serious with the different steps to paint a towel warmer without mistakes.
Applying several thin coats
🌍 Did you know?
Contrary to popular belief, painting a radiator in a dark color such as matte black or anthracite improves its thermal emissivity rate by nearly 5% compared to a glossy white surface, thus optimizing radiation in the room.
Forget immediately the idea of applying a thick coat “to save time.” The secret is multiple thin coats. Two to three applications allow for a clean, uniform finish without annoying drips. The spray paint offers a very nice finish on curves if you master the technique well.
Always let it dry completely between each pass – carefully read the manufacturer’s recommendations regarding the recoating time. Don’t touch too early: a fragile film quickly shows fingerprints.
Drying management and final precautions
Patience is essential during towel radiator renovation. Wait at least 24 hours before turning the radiator back on, or even 48 hours if the room is cool. This is enough to ensure excellent long-lasting adhesion, even with repeated heat exposure.
During the drying period, avoid contact with water and accidental impacts. If you notice slight traces of paint peeling after complete drying, touch up locally by starting again from the undercoat on the affected area.
⚠️ Common mistake
The common mistake is applying the paint while the radiator is still warm or running. The lacquer will dry instantly under the brush, creating thick touch-up marks, drips, and a rough finish.
Practical tips for a flawless and durable result
💡 Practical tip
To apply paint evenly between narrow cylindrical tubes, use a 50-millimeter short-pile mini roller (rabbit foot) combined with a special angled radiator brush for hard-to-reach corners.
Experience has taught me never to neglect the slightest step, even the simplest ones. Put masking tape around the fittings and on adjacent walls; it prevents many mistakes. Remove the towel radiator from the wall if possible; you’ll be much more comfortable reaching every nook and cranny.
Always wear gloves, a mask, and open the window wide when using a spray paint or any radiator paint containing solvents. And above all, choose appropriate tools: small brushes for corners, foam roller for large tubular surfaces.
- Strictly follow the safety instructions and those of the product used
- Plan to protect the floor with a tarp
- Don’t wait until the paint is completely damaged: acting at the first signs avoids many problems and a heavy renovation