When starting a project to attach items to a plasterboard, the famous question always comes up: what size molly anchor should be chosen for ba13? Between doubts in front of the anchor aisle, questions about the diameter or length, and the fear of improperly fixing shelves, it’s anything but trivial. I myself made some mistakes in my early days, which led to some quick repairs… Come on, let’s put down the toolbox and look together at how to no longer make mistakes in choosing and installing the right anchor.
📋 The essentials at a glance: Personally, I consider that choosing the right anchor for plasterboard is the absolute guarantee of a lasting fixture, knowing that a well-installed M4 model can support up to 20 kg of pull-out force. Always match the drill diameter to the weight of your object to avoid damaging the plasterboard. Finally, using a specific expansion plier remains the essential secret for a secure installation.
What is a molly anchor and why use it on ba13?
✅ Strengths of this model
- Exceptional strength in hollow partitions
- Ability to unscrew and reinsert the screw at will
- Firm locking thanks to two lugs under the head
🔻 System limitations
- Requires purchasing a special plier for installation
- Very difficult to completely remove from the wall
- Leaves a fairly large hole (8 to 11 mm) to fill
The molly anchor, this star of indoor projects, reigns supreme whenever we talk about plasterboard fixing. Its well-thought-out design allows for a solid hold even in materials as soft as plasterboard. You see them everywhere, whether to hang an upper cabinet, mount a TV on the wall, or install a heavy ceiling light fixture.
📍 My experience: During the installation of a kitchen in Rennes in 2021, I wanted to fix an upper cabinet with M5 anchors using a simple screwdriver instead of the appropriate plier. The collar ended up spinning in the plaster, tearing off a 5-centimeter piece that forced me to redo the entire panel. The lesson learned is that you should always invest 15 euros in this tool to guarantee a perfect crushing of the star behind the wall.
Why specifically use this type of anchor on ba13? First because it expands behind the partition thanks to its anchor plier, creating a kind of metal anchorage deployed like a flower. As a result, it distributes the load over a larger surface than classic anchors. The ba13 — meaning “13 mm plasterboard,” its standard thickness — finds in the molly anchor a reliable ally against pull-outs.
🌍 Did you know?
The term “BA13” means Beveled Edges and indicates a nominal thickness of 13 millimeters (which is actually exactly 12.5 mm). It is precisely for this reason that the expansion wing of a standard anchor is calibrated with a clamping range of 10 to 16 mm, so that it crushes perfectly against the back cardboard of the panel.
To deepen your knowledge in home improvement, I recommend watching the proper method to fix furniture to the wall which complements this topic well. If you make a drilling mistake, knowing how to fill a hole also provides useful tips to fix it. And to go further in creating your partitions, understanding the placostil system offers interesting insight into the sturdiness of your walls.
Criteria for choosing the right size of your molly anchor
| Anchor Size (Screw) | Drilling Diameter | Max Load Tolerated | Recommended Ideal Use |
|---|---|---|---|
| M4 (4 mm screw) | 8 mm | 20 kg per point | Frames, mirrors, wall lights |
| M5 (5 mm screw) | 11 mm | 40 kg per point | Loaded shelves, TV |
| M6 (6 mm screw) | 13 mm | 50 kg per point | Upper kitchen cabinets |
| M8 (8 mm screw) | 16 mm | 60 kg (with reinforcement) | Water heaters, sinks |
In the tools section, it’s impossible to miss the wall of colorful packets. Anchor diameter, length, strength… it can sometimes be hard to figure it all out. Following a few simple steps helps demystify everything.
Before settling on any anchor size, you need to consider three essential points: the thickness of the plasterboard (the famous ba13), the nature of what you are going to hang, and the desired load capacity. An XXL mirror does not impose the same requirements as a small coat hook!
⚠️ Common mistake
Relying solely on the total length of the metal rod without checking the “clamping range” indicated on the box. If you use a model designed for double plasterboard (BA25) on a single partition, the expansion wing will open in the void behind the panel and will exert no holding force against the wall.
How to adapt the anchor diameter to the fixing?
The anchor diameter directly affects the strength of the plasterboard fixing. With ba13, the most common diameters range from 4 mm to 8 mm, or even a bit more for very heavy loads. The general rule is to choose:
- Diameter 4/5 mm: small objects, light hooks, photo frames.
- Diameter 6 mm: intermediate fixing — light shelf, small wall light.
- Diameter 8 mm: substantial loads, hanging furniture or television.
If you hesitate, keep in mind that with a compatible screw, your fastenings will keep their promise. However, be careful, there is no need to necessarily go for the maximum diameter: this will dig more into the plasterboard and could weaken it around the anchor.
🔧 Tip
To drill plaster cleanly before inserting the metal anchor, never use the hammer function of your drill. Choose a simple metal or wood drill bit and drill at medium speed. This will make a clean hole without splintering the material at the back, ensuring a much better grip of the anti-rotation lugs.
What length of anchor for a ba13 plasterboard?
Another element to watch: the length of the anchor must correspond to the thickness of the board. For ba13, there are specially calibrated models, generally between 33 mm and 50 mm long. The higher the load the fastening is intended for, the more the anchor will find its strength in a long expansion behind the partition.
Avoid using a too short anchor that will not grip enough, or an extra-long version designed for double board or insulation. You risk drilling into empty space or struggling when tightening with the anchor pliers. So, for standard use here (13 mm board), choose a molly anchor rated for “from 9 to 13 mm” thickness, it will be just right.
What types of molly anchors for different uses?
You might think there is only one kind of molly anchor, but that is far from the case! The market offers various models adapted depending on the object to be fixed and the surface encountered.
To never make a mistake and obtain a durable fastening, it is better to take the time to compare the different alternatives. Here is what is most frequently found in stores or on individual construction sites:
Standard anchors for single plasterboards
They are perfectly suitable for the majority of domestic applications: hanging small furniture, coat hooks, and interior accessories. Their expansion ensures an even distribution of the pulling force exerted by the fixed object.
Most are compatible with the majority of wood screws, which avoids chasing exotic references on a Sunday morning. Don’t forget: a clean installation starts with a pre-drilling at the right diameter, then careful placement with the anchor pliers.
Reinforced anchors for heavy loads
Some projects require a “concrete” anchoring, even in plasterboard. To hang a tall sideboard, a bathroom column or a flat water heater, opt for reinforced anchors, often equipped with fins or an extra-large expansion. Their diameter starts at 8 mm minimum and their pull-out strength increases.
Also consider doubling or tripling the number of anchors when the load is really high — it’s better to distribute the effort. It may seem like overkill, but I have already seen a tall piece of furniture topple because the real weight once loaded was not sufficiently anticipated…
Special anchors for complex hollow supports
Even though ba13 remains the standard, some walls have doubled frameworks or include insulation (mineral wool or polystyrene). There are then special long anchors designed to pass through additional layer(s) before expanding their wings. They ensure optimal hold despite the increased thickness.
Always pay attention to the mention “for boards up to x mm” indicated on the box. Too short, your anchor may fail; too long, you’ll end up in the insulation, losing all effectiveness!
Practical steps to effectively install molly anchors on ba13
Installing a successful molly anchor is not just a matter of brute force. By following a precise protocol at each step, you greatly reduce the risk of problems – cracks in the drywall, play in the fastening, or unintended rotation of the anchor. Believe me, nobody likes hearing a piece of furniture hit the floor after two weeks.
Here is my procedure, refined after many projects and some not always pleasant surprises:
- Carefully mark the location of the future fastening, especially if multiple anchors need to be aligned.
- Pre-drill the hole at the diameter suited to the chosen anchor (5 mm, 6 mm, 8 mm…). Don’t rush: drill gently to avoid damaging the top layer.
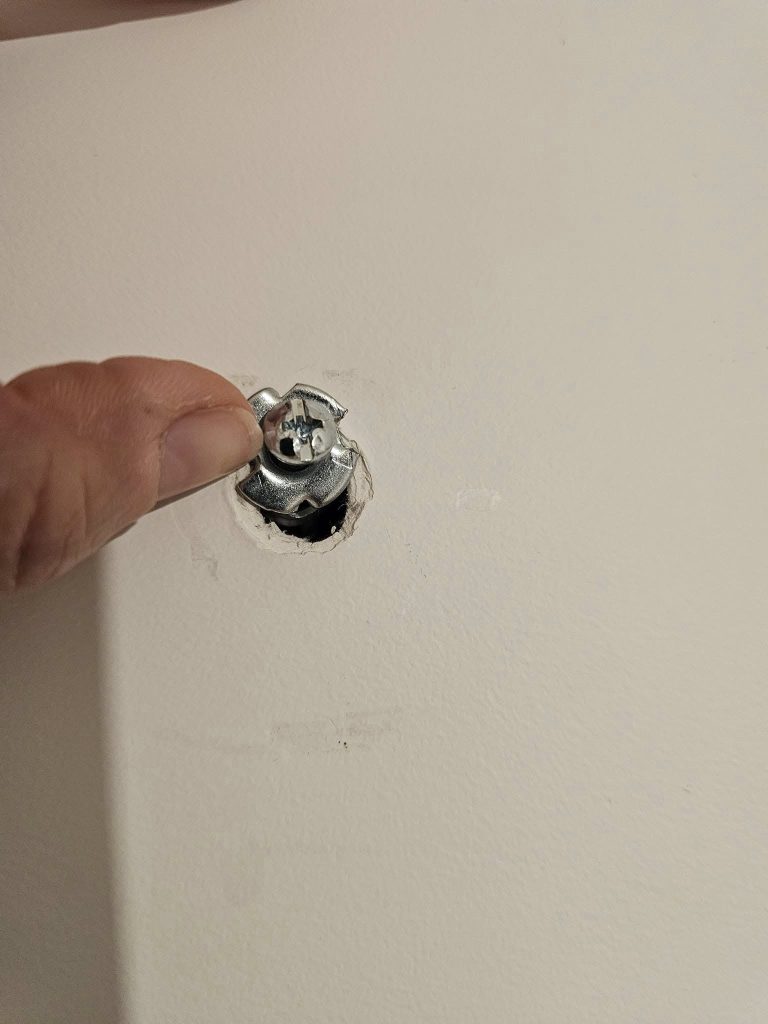
- Insert the molly anchor neatly until its collar is flush with the surface of the ba13.
- Use a proper anchor plier to expand perfectly, without forcing or twisting.
- Screw in the desired object calmly, without excessive tightening that would weaken the plasterboard.
Old handyman tip: when installing near a corner or cutout, consider reinforcing locally with tape or a piece of batten behind, to provide more support to your anchor.
Load capacity and safety: avoiding common mistakes
The big question: how much can a pair or set of molly anchors hold without failing? Manufacturers display impressive numbers, sometimes up to 40 kg… but these performances are achieved under ideal conditions, rarely met at home. That’s why it’s wise to always apply a safety margin, especially when fixing a fragile object or one likely to move regularly.
The main pitfalls to avoid: undersizing the anchor diameter, not multiplying anchors to increase load capacity, or installing the whole setup “by hand” without a dedicated anchor plier. These details may seem trivial but make all the difference over time.
Properly interpreting maximum load indications
Manufacturers test their products vertically without parasitic movement. In real life, repeated swinging, rubbing, or small shocks quickly change the situation. So always plan generously, especially for a book shelf or a fold-away piece of furniture.
Some prefer to reinforce the area with other anchors (plastic expansion anchors or rail fastening of the framework) when dealing with particularly heavy or valuable objects. This creates a welcome additional safety.
Do not neglect the quality of the plasterboards
The ba13 sometimes has weaker areas due to cutouts, electrical grooves, or duct passages. Always inspect and lightly test the chosen spot with a fine needle or screwdriver to check for any prior weakness. If the drywall crunches, it’s better to slightly move the fixing point before using the drill.
Finally, when there is a thick insulating lining, always favor specific long anchors or, if possible, aim to hit “directly on the stud” (hidden metal rail) for security. These small attentions are what make your work last for years after installation.
Bonus tips for a perfect fixing on ba13
After spending hours on my own walls, I allow myself to share some foolproof tips gathered over time. They make the difference between a shaky fixing and a secure installation, the kind you don’t think about afterward…
- Never use a hammer to drive in a molly anchor, it crushes the collar and damages the plasterboard — always use your hand and pliers!
- For long elements, always mark your points using a laser level or bubble ruler, nothing worse than a crooked wardrobe.
- If exceptional sealing is needed, inject a drop of fast-setting glue behind the anchor just before expansion to stiffen the entire block.
- For each new anchor size, do a test on an off-cut (drywall scrap) to judge the hold, this avoids unpleasant surprises on your real wall.
And don’t forget: better a slightly too long anchor than one that wiggles. Take the time to read the instructions, adapt your tools, and ask for advice at the counter if needed, rather than rushing headlong.