Like stone, concrete blocks, wood cladding, brick, steel, or concrete slabs, plasterboard panels are among the most commonly used construction materials.
In recent years, the placostil partition wall has been gaining popularity. It consists of plasterboard placo panels that are screwed onto a galvanized steel placostil frame.
If you want to use it, it is necessary to know the important information about it. It should be noted that placostil offers you multiple uses. Before going into details, it is important to explain its definition.
📋 📋 What you need to remember: Personally, I consider the Placostil system to be the most reliable and versatile technical solution for building interior partitions, representing today more than 70% of renovation layouts. Its lightweight metal structure offers excellent mechanical resistance while simplifying insulation integration. By mastering the spacing and placement rules, you will achieve perfectly flat surfaces ready to paint.
What is placostil and what are its main uses in the field of construction?
| Characteristic | Description |
|---|---|
| Definition | System of partitions, linings, and ceilings with metal framework and plasterboard panels. |
| Advantages | Lightweight, quick installation, modularity, acoustic and thermal performance. |
| Applications | Interior partitions, false ceilings, linings, residential and commercial fit-outs. |
| Types of panels | Standard, water-resistant (wet rooms), fire-resistant, high hardness. |
| Metal framework | Galvanized steel rails and studs to ensure rigidity and durability. |
| Integrated insulation | Possibility to add glass wool, rock wool, or thermal insulators. |
| Standards & compliance | Compliance with French construction standards (DTU, acoustics, fire safety). |
You may have heard of the placostil distributive partition placoplaster or the placostil distribution partitions. But you do not know exactly what this material is made of.
Placostil is nothing other than a mixture of cardboard and plaster. To make it, you simply create a homogeneous paste with fibers, hydrated calcium sulfate, and of course water and some additives.
Then you apply the paste onto cardboard to get a placostil panel. It solidifies after drying at a high temperature. The resulting placostil is not only a construction material but also a renovation material.
It is generally found in the composition of partitions and false ceilings. It allows the creation of placostil distribution partitions. These consist of plasterboard panels from 13 to 18 mm thick. They are then screwed onto a galvanized steel frame.
Simply put, the placostil partition combines a metal framework and plasterboard placo panels. The rails of the metal structure are fixed to the ceiling and floor. This allows creating new spaces.
💬 Personal anecdote: During the renovation of my office last February, I chose to install a double soundproof partition over a length of 5 meters to isolate myself from the noises of the living room. I spent about 180 euros on rails and metal studs, and the project was completed in a single weekend of meticulous work. The lesson learned is that it is absolutely necessary to glue an acoustic resilient strip under the bottom rails to effectively block the transmission of vibrations through the floor.
Besides that, placostil is used as a lining with a single plasterboard. But when you use two plasterboards, you can create a partition with two different faces of the wall.
This material is also an interior facing plasterboard. It simplifies the construction of a suspended ceiling.
Like the placostil distributive partition, the placo plasterboards are screwed onto a galvanized steel frame. Inside the empty space, you have the possibility to insert insulation that improves thermal resistance.
🌍 Did you know? A standard Placostil partition only 74 millimeters thick with a layer of internal mineral insulation offers an acoustic attenuation of 42 decibels, which is much more effective than a traditional solid brick wall that is twice as heavy.
What are the different thicknesses of placostil available on the market and how to choose the one that best suits my project?
| Profile type | Standard width | Recommended use | Maximum spacing |
|---|---|---|---|
| Rail R48 | 48 mm | Fixing to floor and ceiling for partition | 60 cm |
| Stud M48 | 48 mm | Vertical structure of standard partition | 60 cm |
| Furring channel F530 | 45 mm | Frame for suspended ceiling and lining | 50 cm |
| Stud M70 | 70 mm | Partition with high insulation or great height | 40 cm |
When you plan to set up a functional studio, you want to create a partition to delimit spaces. Before doing so, know that placostil comes in many thicknesses ranging between 5 cm and 8 cm.
This variety is explained by the type of placo plasterboards, for example standard, water-resistant, fire-resistant boards, and more.
The standard thickness of a placostil partition is 72 mm. But there are also some categories of Placostil distribution partitions with thicknesses of 80 mm, 100 mm, or even 128 mm. There is a wide range of performance levels that suit all needs.
You are free to choose the dimension that corresponds to the properties of the plasterboard. You must make your choice based on the intended use of the placostil, which offers various applications.
If you plan to create a separation, favor thick materials. The same applies when you intend to optimize insulation. The thick placostil partition is also used in tertiary or industrial buildings, cinemas, or theaters.
As for thin placostil plasterboard, it is the ideal material especially for decorative fittings. Regarding the standard thickness, it is suitable for the majority of wall and partition linings.
How to properly install placostil boards on a wall or ceiling for a smooth and uniform finish?

Whether you use it on the ceiling, as a partition wall or as lining, handling placostil is not only for professionals. Anyone can proceed with its installation without any problem.
For installing a placostil partition, start by gathering the necessary tools such as a tape measure, a mason’s ruler, metal studs and tracks, placo hangers, special plasterboard filler, a board lifter, adhesive mortar and much more.
⚠️ Common mistake: Fixing plasterboards directly into the top and bottom horizontal tracks. The tracks must remain free to absorb structural movements of the building. Screws should only be placed on the vertical studs to ensure that joints do not crack over time.
That said, start the work by installing the partition framework. Mark its position to facilitate the placement of the tracks. As for fixing them to the ceiling, drill with a concrete drill bit every 60 cm. Be sure to accurately measure the level between the ceiling and floor then subtract 1.5 cm determining the stud.
Next, install the stud to the wall. After assembling the framework of the placostil partition, the next step is to place its two faces one at a time. Firmly attach the plasterboard against the framework and screw the studs.
💡 Practical tip: For ideal screwing, the head of the plasterboard screw should sink 1 millimeter below the surface of the cardboard without ever tearing it. Use a specific screw bit with an integrated depth stop to ensure perfect masking when applying the filler.
Do not forget to run electrical conduits and install insulation. This helps improve sound and thermal insulation.
As for finishing, it is important to fill gaps using a sealant. Once this step is completed, use filler, preferably ready-to-use. Make the joints and cover the screw heads. They can detract from the appearance of the plasterboard partition. To maintain flatness, thin joints can do the trick.
What are the advantages of placostil compared to other building materials, such as wood or concrete?
👍 Strengths
- Quick dry assembly with no drying time
- Convenient passage of electrical conduits in the studs
- Excellent flatness facilitating decorative finishes
🔻 Limitations
- Requires expansion anchors for heavy loads
- Low water resistance without water-repellent boards
- Joint taping requires skill
While wood is admired for its natural charm, concrete differs by its solidity. As for placostil, this material offers countless strengths. It is no surprise that it is widely used in renovation as well as construction work.
Its standout advantage lies in its ease of installation. It is perfect for covering pipes and walls, optimizing the aesthetic aspect. Thanks to its smooth surface, you can easily wallpaper or paint it.
If you plan to add insulating panels, this poses no problem with placostil. Installing a lighting system is child’s play. Its installation offers a real time saving.
Compared to other materials, placostil is easier to maintain. Regardless of the thickness of the plasterboard, it is easy to clean. Stains disappear with mild soap and a little water.
That’s not all, this material is highly versatile. It can be used for many different purposes.
Besides creating partitions, you can use it to make niches, enliven your ceiling or wall, highlight your living room or library.
Placostil partition walls are modular. They can be adapted to any room.
Depending on the plasterboards chosen, they can meet all requirements, whether in terms of thermal or acoustic insulation, burglary resistance, fire protection, and much more.
Regarding its drawbacks, placostil is criticized for its lack of robustness. After violent impacts, it can break.
It also does not tolerate moisture. If you do not care for it regularly, its durability is questionable. In terms of price, placostil is somewhat expensive.
What are the different methods for fixing placostil boards and which is best suited for my project?
Two techniques for fixing placostil can be distinguished. The installation of screwed boards on a galvanized steel frame is among the most commonly used practices. This operation proves to be the most reliable and effective.
It involves fixing the plasterboard sheets onto a galvanized steel frame comprising rails. You screw the facings of the placostil partition onto studs.
This method gives you the opportunity to insert insulation between the boards. Integrating wiring is also an easy task.
Alternatively, you can assemble placostil by gluing. It must be admitted that this technique requires skill to ensure the solidity of the installation.
Moreover, it is imperative to use only a special plasterboard adhesive to achieve excellent results.
To do this, you just have to fix the placostil panels directly to the wall using glue. When applying the glue spots, you must maintain a spacing of 25 to 30 cm on the panel. Gently flatten the glue and use a ruler to check the flatness of the panel.
If necessary, consider repairing any irregularities. To finish, bring the panels closer together using a joint tape.
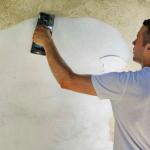
How to achieve perfect finishes and joints between placostil panels to obtain a professional result?
Jointing is a crucial step ensuring the final appearance of the placostil partition. It also guarantees the robustness of the assembly and prevents possible cracks in the future.
To carry it out properly, it is recommended to use a quality filler. The ready-to-use product greatly simplifies the tasks for you.
To apply it, use a putty knife. Be sure to properly adjust the dimensions of the joint and those of the joint tapes.
For the application of the latter, follow the lengthwise direction. They must be smoothed gently with another putty knife that is wide and thin enough.
After drying, remove all residues. If needed, apply a layer of filling compound. The final step is to apply the finishing coat.
What precautions should be taken when installing placostil to ensure the safety and durability of the construction?
The installation of your plasterboard partition facing of the placostil type is not to be taken lightly. The operation guarantees its lifespan and the safety of the structure.
If you want to enjoy it for a very long time, choose a high-quality material. Remember that placostil comes in many models. There is nothing better than opting for the best example. It promises an excellent lifespan.
Depending on the room, know that its category differs. If you plan to install it in a bathroom, favor a water-resistant plasterboard. Although it is more expensive to buy, it resists very well over a long period of time.