When you spend your weekends tinkering, you always encounter small challenges that seem trivial at first. There’s that famous gap between the baseboard and the floor, the one you don’t notice right away, but that eventually draws all the attention. And then, sometimes, the project gets tricky with electrical questions, like connecting a ventilation system to a light switch. I’ve come across this double issue more than once during renovations. So, it’s worth sharing methods, tips, and a few mishaps that could save you a lot of trouble.
📋 Key points: Personally, I consider sealing the gap under woodwork an essential step to stop cold drafts and insect intrusions. In 90% of cases, a simple acrylic bead or a foam backer rod is enough to fix this recurring aesthetic problem. It’s a quick technical finish that significantly improves acoustic and thermal insulation at the base of the walls.
Why is filling the gap between baseboard and floor essential?
The gap between baseboard and floor often causes problems, especially in old houses where the floorboards move and undergo shifts. If you ignore this small crack, you risk not only accumulating dust and debris but also allowing moisture to pass through or creating a favorite spot for insects looking for a discreet shelter.
🌍 Did you know? Unsealed gaps under lower joinery account for nearly 5% of heat loss due to unwanted air exchange in living rooms. Cold air freely circulates under the boards from the crawl space or peripheral partitions.
Another detail: this gap breaks the aesthetic finish of your floor. Even after laying the floor like a pro, a beautiful solid wood baseboard can quickly lose its charm if the joint between the two isn’t neat. To do it well, there are several solutions to fill the gap depending on the width to be concealed and the desired finish.
🗣️ My experience: During the renovation of an old apartment in Lyon last March, I measured cracks up to 8 millimeters between the back of the baseboards and the oak planks caused by the sagging of old joists. Instead of dismantling everything, I inserted a backer rod before applying an elastomeric sealant tinted to match the wood species. The lesson learned is that using a classic non-elastic acrylic product cracks at the first seasonal changes.
What are the solutions to fill the gap?
Faced with a gap, every DIYer has their favorite method: sealant, quarter-round molding, backer baseboard… The choice depends on the type of floor, the width of the space, and the expected finish. To refine your decision and succeed in the installation, here are some avenues to explore.
To go deeper, I recommend browsing our guide on waxed or varnished parquet which complements this topic well. Addressing underlying issues like baseboard mold also provides useful tips to sanitize the surface before masking. And to perfect your caulking finishes, our tutorial for smoothing silicone joints offers interesting insights.
Putty or silicone: effective simplicity for small gaps
When the gap between baseboard and parquet is small (less than 5 mm), putty remains the number one ally. Choose a flexible putty, compatible with wood and flooring, that will follow natural movements related to temperature or humidity changes. Apply it with a gun, smooth it with a wet finger, and you will hardly see the joint anymore. Prefer neutral translucent silicone if you want to be discreet, otherwise choose a color close to your parquet.
Note that a putty that is too hard risks cracking if the parquet continues to move. Take your time to smooth it properly, to avoid smudges that are difficult to remove on untreated wood. This solution is suitable both during the initial installation and for a quick renovation, without major work.
| Technical solution | Maximum gap width | Mechanical flexibility | Paintable |
|---|---|---|---|
| Acrylic wood putty | 4 mm | Medium | Yes |
| Tinted elastomer silicone | 6 mm | Excellent | No |
| Backer rod + putty | 12 mm | Excellent | Yes (depending on putty) |
| Nail-on wooden quarter round | 20 mm | None (covers the gap) | Yes |
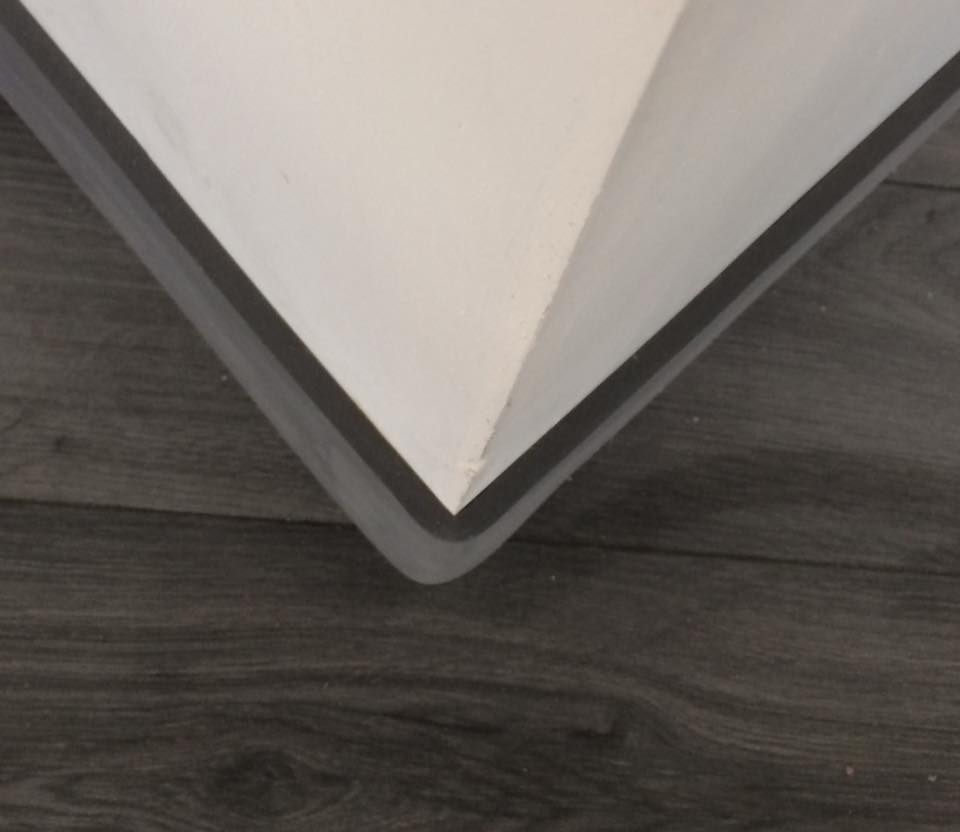
Quarter round molding or counter-baseboard: robust and decorative finish
As soon as the gap exceeds a few millimeters, it becomes difficult to neatly mask it with putty alone. This is where the quarter round molding or the counter-baseboard come into play. Easy to install, these accessories also help to correct wall defects or old imprecise cuts. Attach them with wood glue, or even with very fine nails – it’s discreet and holds up well against accidental bumps from vacuum cleaners or brooms.
You are free to choose between raw wood, to varnish on site, or a pre-stained version matching your main baseboard. The main thing: make sure to cut the angles cleanly to maintain a uniform effect from one room to another.
- Flexible putty suitable for wood
- Quarter round molding or counter-baseboard depending on the gap size
- Wood glue or fine nails for fastening
- Caulking gun, spatula for smoothing
- Fine saw for precise cuts
How to properly prepare the area before work?
Before filling the gap between baseboard and parquet, take the time to properly prepare the surface. Many failed finishes simply come from a lack of cleaning or a poorly prepared substrate. First vacuum along the baseboards to remove dust, small gravel, or glue residues.
Next, check the condition of the baseboards and the flooring. If some parts are detached or damp, it’s better to fix this issue before applying putty or installing a molding strip. On an old floor, a light sanding can also improve the adhesion of the products used.
Also remember to protect your floor with masking tape. This small precaution prevents silicone or glue marks that are difficult to remove after drying. Careful preparation guarantees you a much cleaner and more professional result.
⚠️ Common misconception: Using plaster or rigid smoothing compound to fill the empty space. The flooring moves a few millimeters between summer and winter. A rigid product will crack, crumble, and flake off in small pieces after only a few weeks of foot traffic.
Mistakes to avoid when filling gaps
One of the most common mistakes is using an unsuitable product. Some traditional putties become rigid after drying and end up cracking due to the natural movements of the wood. You should always choose a flexible product specially designed for flooring or woodwork.
Another common trap: trying to fill a gap that is too wide using only silicone. Not only is the result unattractive, but the joint is also likely to peel off quickly. For larger gaps, it’s better to install a molding strip or a suitable baseboard cover.
Finally, many DIYers neglect the finishing touches. Yet, poorly cut corners or a badly smoothed joint are immediately noticeable. Use a miter box for your cuts and take the time to work neatly. A few extra minutes can make all the difference in the final appearance.
What maintenance after filling the gap?
💡 Practical tip: Remove the masking tape placed on the wooden planks immediately after smoothing your acrylic bead, without waiting for it to fully dry. If the product starts to polymerize, removing the tape will tear and fray the edges of the finish.
Once the work is finished, minimal maintenance helps keep a flawless finish for several years. Avoid, for example, excessively wet cleaning, especially on natural wood flooring. Too much water can weaken the joints and cause the floor to swell.
Also inspect the baseboards from time to time, especially after seasonal changes. Wood naturally reacts to humidity and heat. If you notice slight shrinkage or a small crack, a quick touch-up with putty usually suffices to prevent the problem from worsening.
For raw wood quarter-round moldings, a varnish or protective paint layer can extend their lifespan. Besides improving aesthetics, this also makes daily cleaning easier against dust and marks.
Summary: which solution to choose according to your project?
Filling a gap between baseboard and flooring is not complicated, but the choice of method mainly depends on the width of the gap and the desired finish. For a small discreet crack, flexible putty remains the fastest and most economical solution. However, for larger gaps or irregular walls, quarter-round moldings and baseboard covers offer a much more durable finish. Among many other solutions, here is a comparison between polymer sealant and wooden profiles:
🍀 Good points
• Invisible solution after smoothing and painting.
• Total barrier against dust and insects.
• Follows the material’s movements without breaking.
🔻 Limitations
• Requires a steady hand for an even line.
• Risk of yellowing depending on product quality.
• Difficult to apply if the gap exceeds 12 mm.
Taking the time to prepare the surface and choose the right materials makes all the difference. With a few simple tools and some patience, you can achieve a clean, aesthetic, and durable result. Even a tired old floor quickly regains a much neater appearance thanks to these small finishing touches.
In the end, these details that seem secondary completely change the look of a room. A beautiful junction between baseboard and floor immediately gives the impression of clean, professional work, while durably protecting your floor against wear and moisture.
Calculez le nombre de cartouches de mastic à prévoir pour votre pièce.
Estimation de votre besoin :
Volume estimé : cartouche(s) de mastic acrylique (Buse fine).
Volume estimé : cartouche(s) de mastic élastomère.
Volume estimé : cartouche(s) + mètres de fond de joint en mousse.
Answers to your questions about floor covering finishes
Why is silicone sealant not recommended with paint?
Standard silicone repels water-based coatings. If you apply paint on a silicone bead, it will bead up, retract, and flake off immediately upon drying.
Is it normal for a gap to appear after floor installation?
Yes, the living material expands and contracts depending on the home’s humidity level. That is why a peripheral expansion gap is mandatory during installation.
How to fill a very deep crack without emptying the tube?
You need to insert a foam backer rod called a joint backing into the gap. This blocks the depth and allows for a perfect surface seal.