Whether you are equipping yourself with a suspended ceiling, a coffered ceiling, a floating ceiling, or a classic ceiling, this upper part of a living room needs to be beautifully enhanced.
Sometimes, we focus on wall decoration ideas and neglect the rest. However, the ceiling also holds an important place in the interior decoration of the home. It deserves your attention when you plan to bring a touch of freshness to your home.
If you are considering painting the ceiling with suitable paint, this article serves as your guide. Discover all the tips for painting a ceiling like a pro.
📋 Key points: Personally, I consider that the success of a ceiling depends 80% on the preparation of the surface and the choice of a matte, slow-drying paint. Using a telescopic pole allows maintaining constant pressure and avoiding overlap marks on large surfaces. I recommend working in 1 m² zones following the natural light to avoid missing any visual gaps.
What preparation is necessary before repainting a ceiling to ensure good paint adhesion?

Preparing the ceiling is one of the very essential steps for painting a ceiling. It contributes to the quality and final appearance of the paint. The ceiling may already appear painted and be in good condition. Yet, you want a change and wish to repaint it. In this case, a simple cleaning is enough before the ceiling paint application.
But if the surface has not been painted before or if it is stained, it becomes necessary to prepare it properly. The same applies when you notice cracks. You must address the problem before painting over marks on the ceiling.
Due to dirt or humidity, the ceiling can become covered with stains. If these are dry, you only need to dust off the surface and then apply an acrylic primer. After drying, you can proceed with the ceiling painting.
🗣️ My experience: During my first renovation in 2021, I wanted to repaint a living room ceiling in the middle of summer at 28°C. The paint dried so quickly that each roller pass created a visible line. Restarting at dawn the next day, with windows closed to keep the humidity, the result was finally flawless. The lesson is simple: the weather is your worst enemy or your best ally for a ceiling without marks.
If there are greasy marks, you can get rid of them by cleaning with warm water and alkaline detergent. After rinsing with clear water and drying the surface, remember to apply a coat of acrylic paint over the marks.
Because of humidity in the house, mold can also form on the ceiling. In this case, it is preferable first to call a professional to treat the cause of the problem. This often comes with mold stains on the windows or on the walls.
Once the issue is resolved, you can remove stains by scrubbing them with bleach and water. As with the ceiling painting tips above, consider applying a primer before the ceiling painting application.
For surfaces with cracks, it is urgent to fill them with a smoothing compound. If the crack is more than 3 mm deep, it is better to use a filling compound. And regarding peeling or damaged paint, be sure to sand the ceiling before applying a primer.
How much does professional ceiling repainting typically cost?
If you want to save money, it is possible not to consult an expert. However, the latter is capable of perfectly mastering the ceiling painting steps for stains. Moreover, they have the right tools and necessary equipment to successfully complete the painting work. To avoid mistakes, it is safer to use the services of a specialist.
Generally, the cost of their intervention ranges between 15 to 35 euros per square meter. This pricing relates to a classic ceiling painting work service including the application of two coats and the price of the paint. However, be sure to consider the painter’s travel costs when determining your budget.
It is advisand to request several different quotes to help you find the best price. Take the time to inquire about the provider’s knowledge, experience, and integrity before making your choice.
There are multiple factors that determine the cost of these services. This concerns, for example, the type of ceiling paint to be applied, the surface area to be painted, the difficulty of access or the height of the ceiling, the number of coats, the condition of the ceiling, and more.
What type of paint is best suited for repainting a damaged or stained ceiling?
Before the ceiling painting application, a stained or damaged surface must be properly prepared. It needs to be cleaned to remove dirt or grease marks. If the old paint is peeling, sanding must precede the other ceiling repainting steps. It is also imperative to wash the surface before applying the primer.
For painting ceiling stains, oil-based paint is often criticized for its harmful effect on human health. Nevertheless, it is suitable for the ceiling of a humid room due to its resistance to moisture.
When watching a ceiling painting video, professionals generally recommend acrylic paint. Not only does it have no impact on your health, but it is also favored for its quick drying.
🌍 Did you know? Painting a ceiling white increases the natural brightness of a room by 20%. For optimal effect, choose a “pure” white rather than an off-white, as it better reflects the full light spectrum.
There is nothing like choosing a matte acrylic paint for your ceiling with some imperfections. Thanks to its covering power, it can mask surface defects. It also helps smooth out irregularities. Additionally, it has recently become trendy. This ceiling painting paint brings softness and simplicity.
Among the best brands, you can choose between Seigneurie paint, Renaulac, Zolpan, Unikalo, and Tollens. The product is easy to find. It is available in almost all paint stores in every city.
| Surface (m²) | Paint (Liters) | Estimated time | Number of coats |
|---|---|---|---|
| 10 to 15 m² | 2.5 L | 3 hours | 2 |
| 20 to 30 m² | 5 L | 5 hours | 2 |
| 40 m² and up | 10 L | 1 day | 2 |
| Stained ceiling | + 20% volume | + Sanding | 3 (including primer) |
Besides that, take the time to read this summary of the choice between single-coat and two-coat paint:
🌟 The advantages
- Masks defects (matte finish)
- Visually enlarges the space
- Immediate refresh
🔍 Drawbacks
- Physical work (neck and arms)
- High risk of splashes
- Drying sensitive to weather
Are there specific techniques to avoid streaks and ensure a uniform finish when repainting a ceiling?
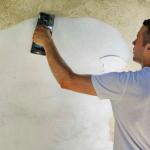
Before you start, it is important to adopt the right ceiling painting gestures. This allows you to guarantee the quality of the ceiling paint streaks. For this, it is recommended to work with your dominant hand.
If you are right-handed, you can hold the roller so that the handle is on the right. Think about painting from left to right. For left-handed people, they can paint ceiling streaks in the opposite direction.
⚠️ Common mistake: Pressing too hard on the roller to squeeze out the paint. This creates ridges of material on the edges of the stroke that turn into cords once dry. Let the roller glide without excessive pressure.
Among the ceiling painting tips from professionals, they generally suggest starting work on the moldings and corners. Preferably, using a cut-in or edging brush is a good idea.
It is strongly recommended not to apply too much pressure on the roller. Otherwise, roller marks may form.
Likewise, you need to use enough paint. If you tend to economize too much, the coats become too thin and streaks appear quickly once the paint dries. Accordingly, spread a reasonably thick coat on the ceiling paint streaks. It promises you good coverage and better durability.
While you are doing the ceiling painting, it is unnecessary to pause between each roller stroke. This also prevents the appearance of paint streaks. Please paint in one go. Otherwise, the different drying times leave imperfections.
What is the drying time required between two coats of paint when repainting a ceiling?
Even if the ceiling painting steps are well followed, but you neglect the drying hours, do not expect to get the desired results. It is recommended to wait patiently between paint coats. This duration is usually indicated on the paint can.
When you watch a ceiling painting video, you notice that drying each coat is essential, especially for the paint’s adhesion. When it is fully dry, applying the next coat becomes easier.
The same goes for applying the primer. You must let it dry until the ceiling gradually absorbs its components to nourish it. So avoid moving on to the next ceiling painting steps while the surface is not yet ready.
Drying time can vary depending on the type of paint. If you choose acrylic paint, it makes the task easier as it can dry in one or two hours. On the other hand, alkyd paint requires you to wait between six to eight hours between each coat.
If you are very impatient, know that it is still possible to reduce this drying time. It is recommended to paint ceiling marks when the temperature ranges between 10 °C and 25 °C. If you have to work in winter, do not hesitate to use a heater in the room to facilitate drying.
Likewise, good ventilation speeds up this waiting time. Make sure the room is well ventilated. Before painting work, try to open the windows. But when you plan to paint ceiling steps, you should close them to limit drafts. They facilitate the deposition of dust on the ceiling.
How to avoid paint drips on furniture when repainting a ceiling?
Removing paint stains from your chair is not an easy task at all. It is therefore essential to protect your furniture throughout the ceiling painting process.
If possible, it is advisand to remove it from your workspace. Do not hesitate to ask for help from your neighbors or family. If your furniture is fixed or cannot be moved, please cover it with a plastic tarp.
If you do not have one, you can simply use an old sheet. It should be thick to provide good protection for the furniture. In the same context, remember to cover your fireplace as well as your radiator while you work.
The floor must also be covered with another tarp to prevent paint drips. Make sure this cloth is well stretched using tape designed for painting. It must indeed withstand countless trips back and forth during the work. As for the wall, please install masking tape to avoid overflowing the ceiling paint.
💡 Tip: If you take a break of less than 24 hours, do not wash your roller. Wrap it tightly in cling film or a plastic bag. This prevents water waste and keeps the fibers flexible for resuming work.
Can you repaint a plaster ceiling with the same type of paint as for a wooden ceiling?
When the plaster ceiling loses its shine, it becomes necessary to give it a second life. To achieve this, people often think of painting the ceiling color. In most cases, water damage causes unsightly stains or halos. It is therefore important to choose the right ceiling paint to hide these imperfections.
It is important to emphasize that each surface suits a specific paint. For a plaster ceiling, you must use a paint specially designed for this material. And even if you have a can of wood paint in your workshop, please do not use it to avoid damaging the overall appearance of your ceiling.
The use of acrylic paint is part of the ceiling painting tips from professional painters. It allows for an application that is both quick and easy. Additionally, it dries in a short time. Prefer a model with a matte finish. If you opt for a paint with a glossy effect, it highlights the defects of the ceiling.
What are the potential health risks when carrying out work to repaint a ceiling and how can they be avoided?
Painting work for wall and ceiling involves health hazards. Although these are underestimated by most, they unfortunately are part of reality. In the ceiling painting video, it is often said that acrylic paint is harmful to health. However, if you choose the wrong product, it can cause quite a few problems.
In most cases, paint containing a significant amount of organic solvents affects the nervous system. This toxicity causes symptoms such as memory disorders, fatigue, concentration problems, and more. If you are exposed to solvents for a long time, you risk suffering from depression or muscle weakness.
Besides that, other components of ceiling paint can cause hypersensitivity. During spray painting work, inhalation of particles and vapors is among the risks to be aware of.
To avoid the worst, it is strongly recommended to wear personal protective equipment during ceiling painting application. Use only safe products and inform yourself about the paint’s components before using it.
Do not hesitate to use an effective ventilation system at the workplace. It significantly improves air quality while minimizing the spread of chemical products.
What tools and materials are essential to repaint a ceiling like a professional?

Even if you have followed all the ceiling painting tips mentioned above, but you do not have the right tools, there is less chance of achieving better results. It is therefore crucial to work with adequate equipment and the necessary instruments for ceiling painting. Consequently, you can expect an exceptionally high-quality finish.
First, you need a anti-drip roller with 12 mm fibers. To protect the floor and furniture, use a plastic tarp. To delimit the work areas, use a tape specially designed for painting work.
Also include in your list a cut-in brush and another filling brush. These brushes help you paint the corners. To reach the ceiling, use a step ladder or a telescopic handle. To wipe drips, a sponge and cloth are very useful.
During surface preparation, you need a putty knife and filler compound. To remove dust, use a dusting brush. And for sanding, prefer a fine sandpaper. Also do not forget a paint tray with grid. Besides that, a wooden stick or a mixer allows you to mix the paint effectively.
Last but not least, opt for a high-quality paint when making your choice. Please wear protective equipment during ceiling painting work. For example, you need gloves, a mask, and appropriate clothing.
How to calculate the amount of paint needed to repaint the ceiling of a given room?
To save money, you are considering painting the ceiling paint yourself. However, the difficult step is not choosing the color, but rather determining the amount of paint to use. Calculating the number of liters of ceiling paint must be mastered to avoid ending up with excess or running out of product.
If you indeed want to know the quantity needed to renovate the ceiling painting paint, you must first determine the surface area of the support to be painted. After calculating its length and width, you divide the value by the paint’s coverage. This is often displayed on the can.
That said, you just need to multiply everything by the number of coats to apply. The result obtained is the amount of liters of paint to use for your ceiling. If you feel lost in the calculation, it is advisand to call a professional. With their knowledge in the field, they can handle it without any problem.
Estimate the cost de la peinture pour 2 coats.
FAQ: Successfully painting your ceiling
Why does my ceiling show roller marks?
Is a primer absolutely necessary?
Which finish to choose: matte, satin, or glossy?