.en-bref { max-width: 640px; margin: 2em auto; padding: 1.5em 1.8em; color: #78350f; font-family: “Inter”, “Segoe UI”, sans-serif; text-align: left; position: relative; box-sizing: border-box; background: #fffaf0; border: 1px solid #b45309; border-left: 6px solid #b45309; border-radius: 8px; box-shadow: 0 8px 24px rgba(251, 191, 36, 0.15); }
.en-bref h2, .en-bref .en-bref-header { font-size: 1.15em; font-weight: 700; margin-bottom: 0.6em; color: #b45309; }
.en-bref p, .en-bref li { font-size: 1em; line-height: 1.65; margin: 10px; }
.en-bref strong { color: #451a03; }
.key-takeaways { max-width: 640px; margin: 2em auto; padding: 1.5em 1.8em; color: #78350f; font-family: “Inter”, “Segoe UI”, sans-serif; text-align: left; position: relative; box-sizing: border-box; background: #fffaf0; border: 1px solid #b45309; border-left: 6px solid #b45309; border-radius: 8px; box-shadow: 0 8px 24px rgba(251, 191, 36, 0.15); }
.key-takeaways h2, .key-takeaways .key-takeaways-header { font-size: 1.15em; font-weight: 700; margin-bottom: 0.6em; color: #b45309; }
.key-takeaways p, .key-takeaways li { font-size: 1em; line-height: 1.65; margin: 10px; }
.key-takeaways strong { color: #451a03; }
.key-takeaways ul { list-style: none; padding-left: 0; }
.key-takeaways li { margin: 0.45em 0; padding-left: 0.2em; }
.mg-callout{margin:1.5em 0;padding:.9em 1.1em;border:1px solid;border-left-width:4px;border-radius:10px;font-size:.97em;line-height:1.65}.mg-callout>:first-child{margin-top:0}.mg-callout>:last-child{margin-bottom:0}.mg-callout__label{display:block;margin:0 0 .35em;font-weight:700;font-size:.82em;letter-spacing:.03em;text-transform:uppercase}.mg-callout__label::before{margin-right:.45em;font-size:1.05em;vertical-align:-.06em}.mg-callout–info{background:#eff6ff;border-color:#bfdbfe;color:#1e3a5f}.mg-callout–info .mg-callout__label{color:#2563eb}.mg-callout–info .mg-callout__label::before{content:”2139FE0F”}.mg-callout–tip{background:#f0fdf4;border-color:#bbf7d0;color:#14532d}.mg-callout–tip .mg-callout__label{color:#15803d}.mg-callout–tip .mg-callout__label::before{content:”1F4A1″}.mg-callout–warning{background:#fffbeb;border-color:#fde68a;color:#7a4a10}.mg-callout–warning .mg-callout__label{color:#b45309}.mg-callout–warning .mg-callout__label::before{content:”26A0FE0F”}.mg-callout–danger{background:#fef2f2;border-color:#fecaca;color:#7f1d1d}.mg-callout–danger .mg-callout__label{color:#dc2626}.mg-callout–danger .mg-callout__label::before{content:”1F6D1″}.mg-proscons{display:grid;grid-template-columns:1fr 1fr;gap:16px;margin:1.5em 0}@media(max-width:560px){.mg-proscons{grid-template-columns:1fr}}.mg-proscons__col{padding:.9em 1.1em;border:1px solid;border-radius:10px}.mg-proscons__title{display:flex;align-items:center;gap:.4em;margin:0 0 .5em;font-weight:700;font-size:.9em;letter-spacing:.02em}.mg-proscons__col ul{margin:.3em 0 0;padding-left:1.15em}.mg-proscons__col li{margin:.3em 0;line-height:1.55}.mg-proscons__col–pro{background:#f0fdf4;border-color:#bbf7d0;color:#14532d}.mg-proscons__col–pro .mg-proscons__title{color:#15803d}.mg-proscons__col–pro .mg-proscons__title::before{content:”2705″}.mg-proscons__col–con{background:#fef2f2;border-color:#fecaca;color:#7f1d1d}.mg-proscons__col–con .mg-proscons__title{color:#dc2626}.mg-proscons__col–con .mg-proscons__title::before{content:”274C”}.mg-steps{list-style:none;counter-reset:mgstep;margin:1.5em 0;padding:0}.mg-steps__item{counter-increment:mgstep;position:relative;padding:0 0 1.1em 3.2em;min-height:2.4em}.mg-steps__item:last-child{padding-bottom:0}.mg-steps__item::before{content:counter(mgstep);position:absolute;left:0;top:0;width:2.2em;height:2.2em;line-height:2.2em;text-align:center;border-radius:50%;background:#2563eb;color:#fff;font-weight:700;font-size:.95em}.mg-steps__title{margin:.15em 0 .3em;font-weight:700}.mg-steps__item>:last-child{margin-bottom:0}.mg-kpis{display:grid;grid-template-columns:repeat(auto-fit,minmax(140px,1fr));gap:14px;margin:1.5em 0}.mg-kpi{padding:1em .9em;border:1px solid #e5e7eb;border-radius:12px;background:#f9fafb;text-align:center}.mg-kpi__value{display:block;font-size:1.7em;font-weight:800;line-height:1.15;color:#111827}.mg-kpi__label{display:block;margin-top:.35em;font-size:.85em;color:#6b7280;line-height:1.35}
.wp-block-image,.ai-image{margin-bottom:1.75em}.wp-block-image>figcaption,.ai-image>figcaption{margin-top:.5em}
Home painting equipment is not limited to a can, a brush, and a roller. To repaint a wall or a room under good conditions, you also need to prepare the surface, protect the floor and furniture, work at height without putting yourself in danger, and then properly clean the tools.
This list follows the actual order of a job site: preparation, protection, application, finishing, and storage. You will find the essential equipment, optional accessories, indicative quantities, and a method to avoid unnecessary purchases.
In brief
🧰 The minimum useful kit includes a tarp, masking tape, a roller, two brushes, a tray with a grid, a sponge, a filling knife, and filler. Add the paint and, depending on the condition of the wall, a primer and sandpaper.
🛡️ Protection of the worksite must be installed before opening the can. A properly fixed tarp and suitable clothing limit splashes but do not replace sufficient ventilation.
📏 For the amount of paint, use the coverage indicated on the can. As a guideline, one liter can cover about 10 m² for one coat, but the surface, color, and number of coats strongly affect the actual need.
The list of essential equipment to get started
A beginner can carry out a typical interior job with a relatively compact toolbox. The best strategy is to first buy the equipment used at each stage, then add only if the room, surface, or finish justifies it.
| Category | Equipment to provide | Use | Priority level |
|---|---|---|---|
| Protection | Tarp, masking tape, gloves, work clothes | Avoid stains and protect surfaces | Essential |
| Preparation | Sponge, suitable detergent, filling knife, filler, abrasive | Clean and correct the surface | Depending on wall condition |
| Application | Roller, brushes, tray, grid | Apply the paint neatly | Essential |
| Access | Stable step ladder or telescopic pole | Reach high parts | Depending on height |
| Cleaning | Water, suitable soap, cloths, bags, bucket | Clean tools and worksite | Essential |
The paint itself must be chosen according to the surface, the room, and the desired finish. For a bedroom, living room, or hallway, check in particular the intended use indicated by the manufacturer, the covering power, drying time, and the emission level indicated on the label.
The most important equipment is often the one used before the first coat: a poorly prepared wall remains visible, even with quality paint.
How to prepare walls before painting?
To prepare a wall before painting, start by cleaning it, let it dry, fill in defects, sand the repaired areas, and dust off the whole surface. This advice applies to a healthy and common surface; a damp, crumbly, very powdery wall or one covered with an old questionable finish requires a more cautious diagnosis.
Clean and degrease the surface
A large sponge, a bucket, and a suitable detergent are often enough to remove dust, fingerprints, and greasy deposits. Work from top to bottom, then rinse if the product used requires it and wait until the wall is completely dry before applying a primer or paint.
In a kitchen, around a radiator, or near a door, degreasing deserves more attention. Paint applied on a greasy surface can adhere unevenly, form shiny spots, or peel off more quickly.
Fill holes and correct defects
The filling knife is used to fill small holes, superficial cracks, and old fixing marks with a filler. After drying, sand the repairs with suitable abrasive, carefully remove the dust, then observe the wall under grazing light to spot any remaining hollows.
A scraper can help remove a flake or part of old paint that no longer adheres. However, avoid scraping or sanding old paint aggressively in a home that may contain lead: have the situation checked and apply the appropriate precautions before any intervention.
When should you add a primer?
Wall primer can be relevant on a porous surface, a major repair, a highly contrasting wall, or an old color that is difficult to cover. It promotes more even absorption and can improve adhesion, but its choice must remain compatible with the substrate and the finishing paint.
If the wall is already clean, stable, and uniformly painted, a primer is not automatically necessary. Consult the product’s technical data sheet: it specifies the accepted substrates, coverage, and waiting time before the next coat.
How to protect the floor, furniture, and fixed elements?
Protect the floor with a sufficiently wide tarp, secured with adhesive tape, then move the furniture away or cover it completely. Masking tape protects baseboards, outlets, switches, frames, and other surfaces that should not receive paint.
The paint protection tarp
A thick, non-slip tarp is more comfortable than a very light film that moves at the slightest passage. For an empty room, cover the entire floor surface; for an occupied room, also protect the furniture, handles, and fixed objects that you cannot move.
Secure the edges without creating significant folds in traffic areas. A damp sponge kept nearby allows you to quickly treat a small splatter before it dries, without waiting for the end of the work.
Masking tape
Choose tape suitable for the surface and remove it according to the manufacturer’s instructions, generally before the paint is completely dry. Press the edge of the tape well with a clean finger or a flexible spatula to limit infiltration.
The tape should not be used to fix a poorly installed protection. It holds the tarp and defines the zones, but insufficient coverage will let splashes pass under furniture or along baseboards.
How to choose your roller and brushes?
Choose the roller according to the texture of the substrate and the nature of the paint, then use brushes for corners, edges, and small surfaces. A roller is generally more efficient on a wall or ceiling, while an edging brush allows you to work neatly near a frame.
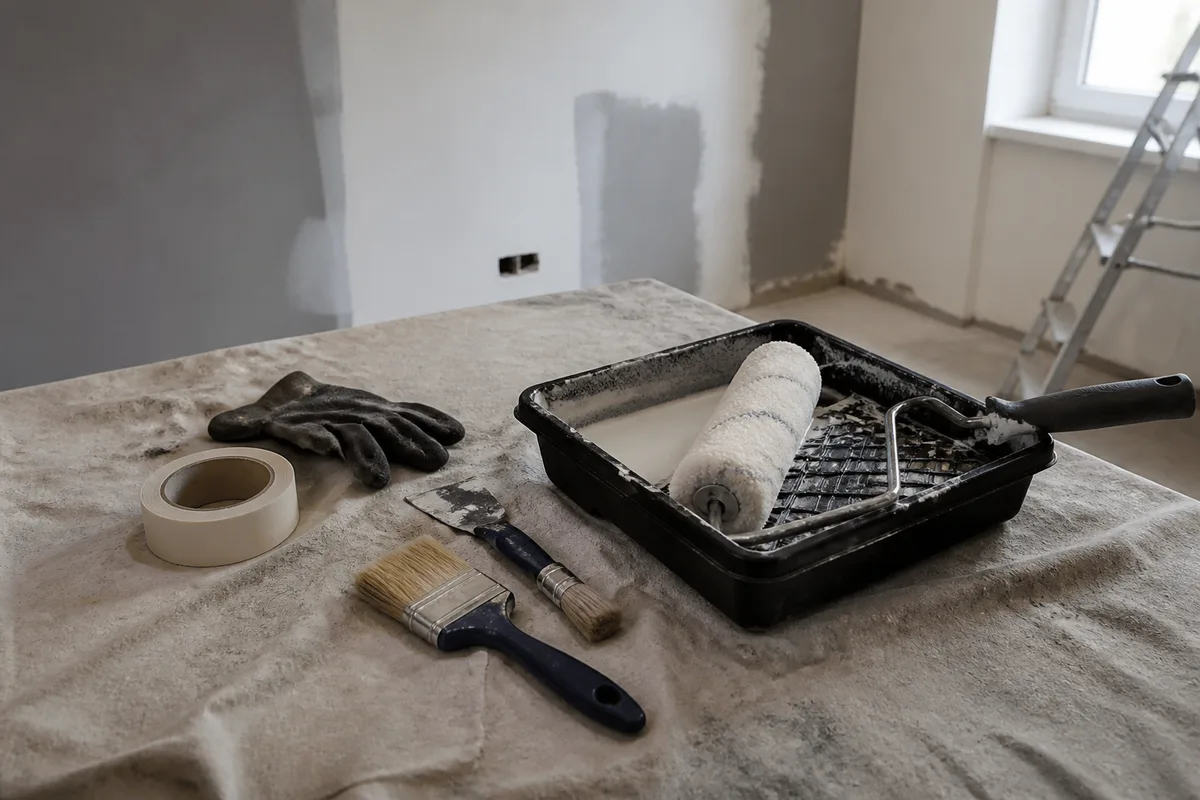
Paint roller for smooth walls
For a smooth interior wall, a roller suitable for wall paints allows you to apply an even coat. A splash-resistant roller can be useful on the ceiling, while a model with longer fibers is more suitable for certain textured surfaces; always check the recommendation on the packaging.
The “patte de lapin” (rabbit’s foot) roller is practical in narrow areas, behind a radiator, or near a difficult corner. For large surfaces, plan a tray wider than the roller and a grid for removing excess paint to distribute the paint without overloading.
Paintbrush according to the finish
The flat brush is suitable for flat surfaces and straight finishes, the round or edging brush for corners and moldings, and the angled brush for hard-to-reach areas. A spalter can smooth certain effects or complement a roller application, but it is not essential for repainting a standard room.
For water-based paint, synthetic brushes are generally suitable. Solvent-based paints can be paired with natural bristles, subject to the manufacturer’s instructions and the cleaning required after use.
To avoid marks and visible touch-ups, preparation of the equipment is as important as the technique. You can consult these tips on equipment for painting without marks before choosing your roller.
| Tool | Main use | Choose if… | Limit |
|---|---|---|---|
| Wall roller | Walls and ceilings | The surface is large and relatively even | Less precise in corners |
| Cutting-in brush | Edges and corners | You need to follow a clean line | Slower on an entire wall |
| Rabbit foot roller | Small areas | Access is narrow | Low output |
| Paint sprayer | Large prepared surfaces | You master the settings and have significant protection | Learning curve, paint mist, and extensive masking |
What protective equipment to plan for safe painting?
Plan for old covering clothes or a smock, suitable gloves, closed shoes, and, if the work requires it, eye or respiratory protection compliant with the product used. Ventilate the room during application and drying while following the label instructions.
Protecting yourself during work
A head covering prevents splashes on the hair, especially when painting a ceiling. Gloves limit contact with paint and cleaning products, but they do not exempt you from reading the pictograms and precautions mentioned on the packaging.
Securing access to high areas
A stable step ladder is recommended for high walls and ceilings. Place it on a clear floor, do not stand on the top rung, and move it rather than leaning sideways to reach a distant area.
A telescopic pole can reduce movement and fatigue, but it does not turn an unstable step ladder into a safe workstation.
How to do it: steps to organize your painting project
A well-organized project limits forgetfulness and avoids walking on a tarp or searching for a tool with paint-covered hands. Gather the materials before starting, then proceed in the following order.
- Empty the room as much as possible and move remaining furniture away from the walls.
- Clean the surface, let it dry, and identify holes, cracks, or peeling areas.
- Fill defects with suitable filler, let dry, sand, then dust off.
- Protect the floor, furniture, baseboards, outlets, and frames with tarp and tape.
- Mix the paint according to instructions and pour a reasonable amount into the tray.
- Start with corners and edges using a brush, then apply paint with a roller in regular sections.
- Respect drying time before deciding if a second coat is necessary.
- Clean tools immediately and carefully remove protections.
For a uniform finish, avoid going over an area that is starting to dry for too long. Work on connectable surfaces, keep a wet edge when the product recommends it, and check the result with side lighting.
How to calculate the amount of paint and number of tools?
Measure the surface to be painted, divide it by the yield indicated on the can, and multiply the result by the number of planned coats. For a rough indoor estimate, one liter can cover about 10 m² for one coat; this estimate remains indicative and should be adjusted according to absorption, color, and wall texture.
Example for a single wall
For a hypothetical wall 4 m wide by 2.5 m high, the surface is 10 m², excluding any deduction for a door or window. With an estimate of 1 liter per 10 m² and two coats, about 2 liters should be planned, then verify the actual yield stated on the can.
Example for an entire room
For a hypothetical room of 12 m² floor area, with four walls of 4 m by 2.5 m, the gross wall surface reaches 40 m² before deducting openings. At two coats and an indicative yield of 10 m² per liter, the theoretical calculation gives about 8 liters; actual consumption may differ.
- Measure each wall separately rather than using only the floor area.
- Subtract doors and windows if their surface area is significant.
- Add a reasonable margin for touch-ups, without buying several extra liters without calculation.
- Keep the exact color reference for future repairs.
Which accessories are optional or can be rented?
The telescopic pole, mixer, worksite spotlight, and some specialized tools improve comfort but are not necessary for all projects. Renting or borrowing may be more sensible when equipment will only be used once.
Accessories that make the work easier
- Telescopic pole: useful for ceilings and high walls with a compatible roller.
- Mixer: practical for homogenizing a large volume of paint.
- Auxiliary lamp: useful for spotting defects under grazing light.
- Bucket with handle: more mobile than a tray when working on a large surface.
The paint sprayer: a relevant purchase or not?
The sprayer may be suitable for large projects or certain finishes, but it requires precise adjustment, extensive protection, and a learning period. To start on one or two walls, rollers and brushes generally remain easier to control.
Equipment intended for other operations should not be purchased reflexively. For example, a sander designed for metal does not replace the abrasive suitable for a wall; tools and precautions differ depending on the surface, as explained in this guide dedicated to metal sanding.
What mistakes to avoid when buying painting equipment?
Equipment mistakes often cost less to fix before the project than after the first coat. The most frequent concern protection, tool compatibility, and surface preparation.
- Forgetting the tarp: splatters quickly reach a porous floor or furniture; protect before preparing the paint.
- Choosing a roller without considering the surface: the right model depends on the wall texture and product; check the packaging.
- Painting directly on a dusty wall: paint may not adhere well; clean, dry, and dust off first.
- Taking a tray that is too small: the roller saturates poorly and drops multiply; choose a tray wider than the tool.
- Cleaning tools too late: paint dries in the fibers and bristles; rinse or clean immediately depending on its base.
Optional equipment can speed up the project, but no accessory compensates for a damp, dirty, or poorly repaired surface.
How to clean and store equipment after painting?
Clean brushes and rollers as soon as the session ends, before the paint hardens. For water-based paint, use appropriate water and soap; for synthetic paint, follow the solvent indicated by the manufacturer and work in a ventilated space.
Cleaning a paint roller
First remove excess paint with the tray grid, then rinse the sleeve until the water runs clear if the paint is water-based. Squeeze it out without crushing and let it dry in a position that avoids deforming the fibers.
Storing equipment between coats
If a second coat is planned soon, wrap the roller and brushes tightly in film or a suitable bag, without letting them soak unnecessarily. This solution is temporary: for a long break, a complete cleaning is safer.
Close the can after cleaning its rim, note the room and color on the lid, then store the paint away from frost and high heat. Never pour paint or solvent residues down the drain; check with your municipality for the appropriate collection system.
What equipment to buy for a wall, a room, or a ceiling?
For a single wall, limit yourself to a roller, two brushes, a tray, a grid, a tarp, and preparation essentials. For an entire room, add a pole or suitable stepladder, more protection, and several sleeves if you want to avoid breaks related to cleaning or changing color.
| Worksite | Minimal equipment | Useful supplement |
|---|---|---|
| A wall | 1 roller, 2 brushes, 1 tray, 1 grid, tarp, tape | Putty, abrasive, sponge |
| A room | Previous kit in appropriate quantity | Extension pole, spare sleeve, auxiliary lighting |
| Ceiling | Suitable roller, tray, tarp, protective clothing | Telescopic pole and stable stepladder |
| Heavily damaged wall | Preparation tools and compatible primer | Diagnosis or intervention by a professional |
Verdict: the home painting equipment to buy as a priority
The most rational selection starts with protection and preparation, then comes application. The trio of suitable roller, precision brush, and tray with grid covers most common interior jobs, while the stepladder or pole depends on the height and configuration of the room.
If your budget is limited, first invest in a proper tarp, reliable masking tape, a suitable roller, and a wall preparation tool. Postpone the spray gun, specialized accessories, and rarely used equipment until the job actually requires them.
For choosing the paint itself, compare the type of surface, the room, the finish, the coverage, and the emissions indicated by the manufacturer. A review of a given range can complement this research, but it does not replace the technical data sheet of the chosen product.
Useful sources to consult
- Castorama: uses of brushes, rollers, trays, tarps, and accessories; to be used to compare tool families.
- Matmut: practical advice on equipment, protection, and cleaning; to be cross-checked with manufacturer instructions.
- Monsieur Peinture: list of supplies and approximate quantities for paint; pot coverage remains the reference.
- Colibri Peinture: information specific to its range and certifications; do not generalize the performance of one brand to all paints.
To remember
- 🛡️ Protect the floor, furniture, and fixed elements before any preparation.
- 🧽 Clean, fill, sand, and dust the wall before painting.
- 🎨 Choose rollers and brushes according to the surface and type of paint.
- 📐 Calculate quantities with the coverage indicated on the pot and the number of coats.
- 🧼 Clean tools immediately to avoid rendering them unusable.
Frequently asked questions
What is the minimum equipment to paint a wall?
Plan for a tarp, masking tape, a roller, two brushes, a tray with grid, a sponge, and protective clothing. If the wall has holes or cracks, add a putty knife, putty, and abrasive.
Is it always necessary to apply a primer before painting?
No, not systematically. It is especially useful on a porous, repaired, highly contrasting surface or one with uncertain adhesion; check the technical data sheets of the paint and primer to verify their compatibility.
How many rollers should be planned for an entire room?
One roller may be sufficient for a small job if you clean it properly between coats. However, having a spare sleeve is practical when the room is large, when two colors are used, or when the first roller starts to lose its fibers.
Can you paint without protecting the floor?
It is not recommended, even for a small job. A tarp fixed with tape limits splashes, roller marks, and stains produced during tray filling or moving the stepladder.
What to do with the roller between two coats?
For a short break, wrap it tightly so that the paint does not dry. If the interruption is longer, clean the sleeve thoroughly according to the type of paint, then let it dry properly before reusing it.
.magic-lb-overlay{position:fixed;inset:0;background:rgba(15,23,42,.92);display:none;align-items:center;justify-content:center;z-index:99999;cursor:zoom-out;padding:20px}
.magic-lb-overlay.open{display:flex}
.magic-lb-overlay img{max-width:95vw;max-height:95vh;object-fit:contain;border-radius:8px;box-shadow:0 8px 32px rgba(0,0,0,.5)}
.magic-lb-close{position:absolute;top:16px;right:20px;color:#fff;background:rgba(0,0,0,.5);border:none;width:40px;height:40px;border-radius:50%;font-size:24px;cursor:pointer;display:flex;align-items:center;justify-content:center}
.magic-lb-close:hover{background:rgba(0,0,0,.8)}
.wp-block-image img{cursor:zoom-in;transition:transform .15s ease}
.wp-block-image img:hover{transform:scale(1.01)}
.magic-img-link{display:inline-block;text-decoration:none}
(function(){
var ov=document.getElementById(‘magic-lb’);if(!ov)return;
var img=ov.querySelector(‘img’),btn=ov.querySelector(‘.magic-lb-close’);
function open(src){img.src=src;ov.classList.add(‘open’);document.body.style.overflow=’hidden’}
function close(){ov.classList.remove(‘open’);img.src=”;document.body.style.overflow=”}
document.addEventListener(‘click’,function(e){
var a=e.target.closest(‘a.magic-img-link’);
if(a){e.preventDefault();open(a.getAttribute(‘href’));return}
var i=e.target.closest(‘.wp-block-image img’);
if(i&&!e.target.closest(‘a’)){e.preventDefault();open(i.currentSrc||i.src)}
});
ov.addEventListener(‘click’,function(e){if(e.target===ov||e.target===btn)close()});
document.addEventListener(‘keydown’,function(e){if(e.key===’Escape’)close()});
})();