Drilling tile without cracking: essential method, tools, and precautions
Drilling tile without cracking mainly requires adapting the drill bit to the material, disabling the hammer function, and working progressively. Wall faience, porcelain stoneware, or natural stone do not react the same way under the drill’s effort.
This tutorial details the equipment to prepare, marking the hole, the drilling technique, and the choice of anchor according to the substrate. You will also learn when to use a diamond hole saw, how to cool a drill bit, and which mistakes can turn a simple hole in the tile into a chip or crack.
In brief
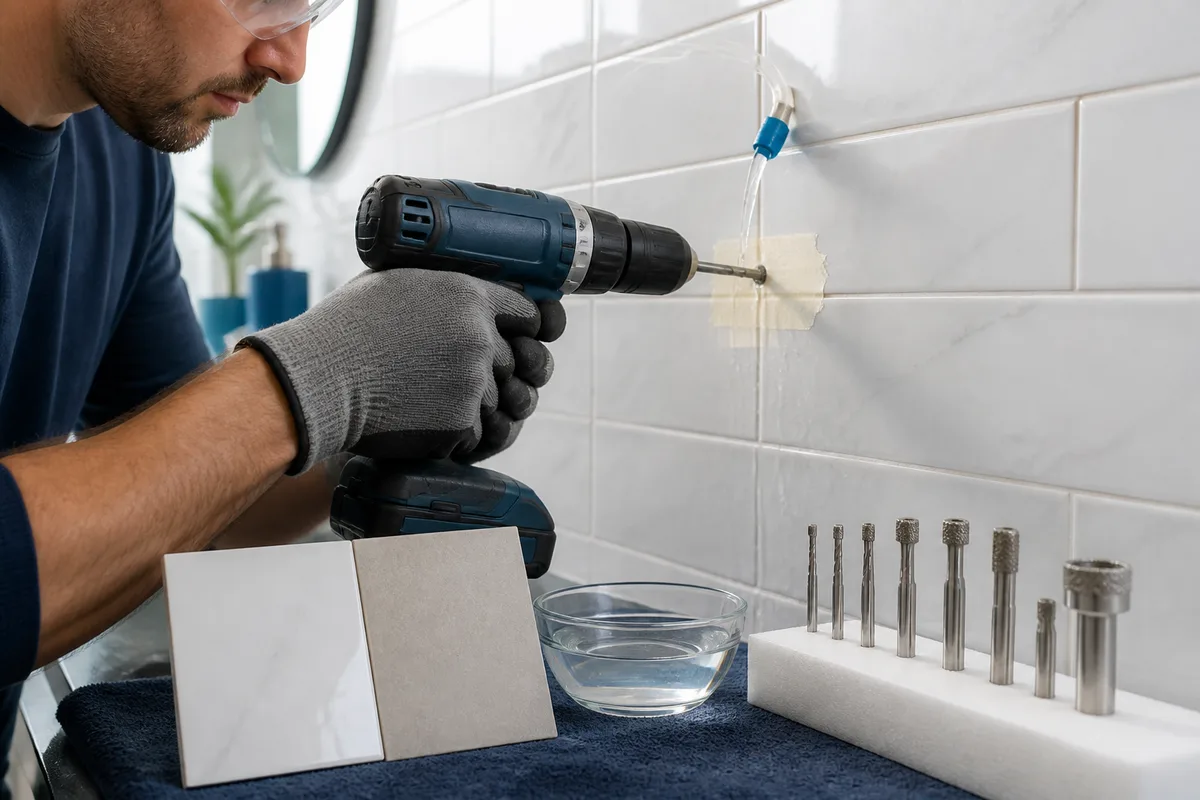
- 🔧 Use a tungsten carbide drill bit for faience and a diamond drill bit for porcelain stoneware.
- 🐢 Disable the hammer function, start slowly, and maintain light and steady pressure.
- 💧 Regularly cool the drill bit with water, especially when drilling porcelain stoneware.
- 🛡️ Check for the absence of cables and pipes before drilling, then choose the anchor according to the wall behind the tile.
Is it possible to drill tile without cracking it?
Yes, drilling is generally possible if the tile is properly installed, if the chosen spot respects a sufficient margin, and if the tool matches its hardness. However, zero risk does not exist: a poorly glued, hollow, or already weakened tile can break despite a correct method.
The most important combination is a suitable drill bit, a drill without hammer function, a slow speed, and moderate pressure. Adhesive tape helps stabilize the tip at startup, while cooling limits drill bit overheating and thermal stresses on the tile.
To drill tile without cracking, the precision of the start matters as much as the drill’s power.
How to choose the tool to drill tile?
To drill tile, first choose the drill bit according to the material, then check that the drill allows speed adjustment and disabling the hammer function. A variable-speed drill-driver is suitable for common small holes, provided you remain perfectly perpendicular to the surface.
A standard drill bit for wood or metal is not suitable for the glazed layer. It risks slipping, heating quickly, and transmitting unnecessary vibrations to the tile.
Which drill bit to use depending on the type of tile?
| Type of tile | Recommended drill bit | Indicative setting | Point of caution |
|---|---|---|---|
| Faience or standard ceramic | Tungsten carbide-tipped drill bit | About 300 to 500 rpm | Light pressure and progressive start |
| Porcelain stoneware | Diamond drill bit | About 500 to 800 rpm | Water cooling essential |
| Large pipe passage | Diamond hole saw | Slow speed, no hammer function | Keep the tool stable throughout the cut |
| Marble or natural stone | Diamond drill bit adapted to stone | According to manufacturer’s instructions | Perform a test and consider a professional |
The speeds mentioned are approximate for residential drilling and should be compared to the drill bit manufacturer’s instructions. A large diameter heats more and often requires more regular watering than a small hole intended for a screw.
What equipment and protection to prepare?
- A variable-speed drill with a disableable hammer function;
- a tungsten carbide drill bit for tile or a diamond drill bit;
- masking tape or strong adhesive tape;
- a pencil, a tape measure, and a level if the fixture must be aligned;
- a spray bottle or a small container of water to cool the drill bit;
- safety glasses and, for some jobs, suitable gloves;
- a cable and pipe detector when the wall configuration is uncertain.
The material behind the tile matters as much as the drill bit. Once the tile layer is penetrated, the fixture must correspond to drywall, concrete, brick, or another substrate.
How to prepare drilling to avoid cracks?
Before starting, precisely locate the center of the hole and check the distance from the edges. A margin of at least 2 centimeters between the hole and the edge of the tile reduces the risk of crack propagation, but it does not compensate for a hollow or poorly installed tile.
In a bathroom or kitchen, also look for embedded networks. Avoid drilling in the vertical or horizontal alignment of a faucet, an outlet, or a powered device, and use a detector if you do not have a reliable plan.
Check the condition of the tile and the substrate
Tap gently around the future hole area and observe the joints. A hollow sound may indicate insufficient adhesion; in this case, the fixing may stress the tile unevenly and cause chipping.
When the tiling is not yet installed, drilling on a thick wooden board offers better control. The tile is then supported on a flat surface, which limits vibrations during the operation.
Stabilize the drilling point
- Measure the hole location and mark it with a suitable pencil or marker.
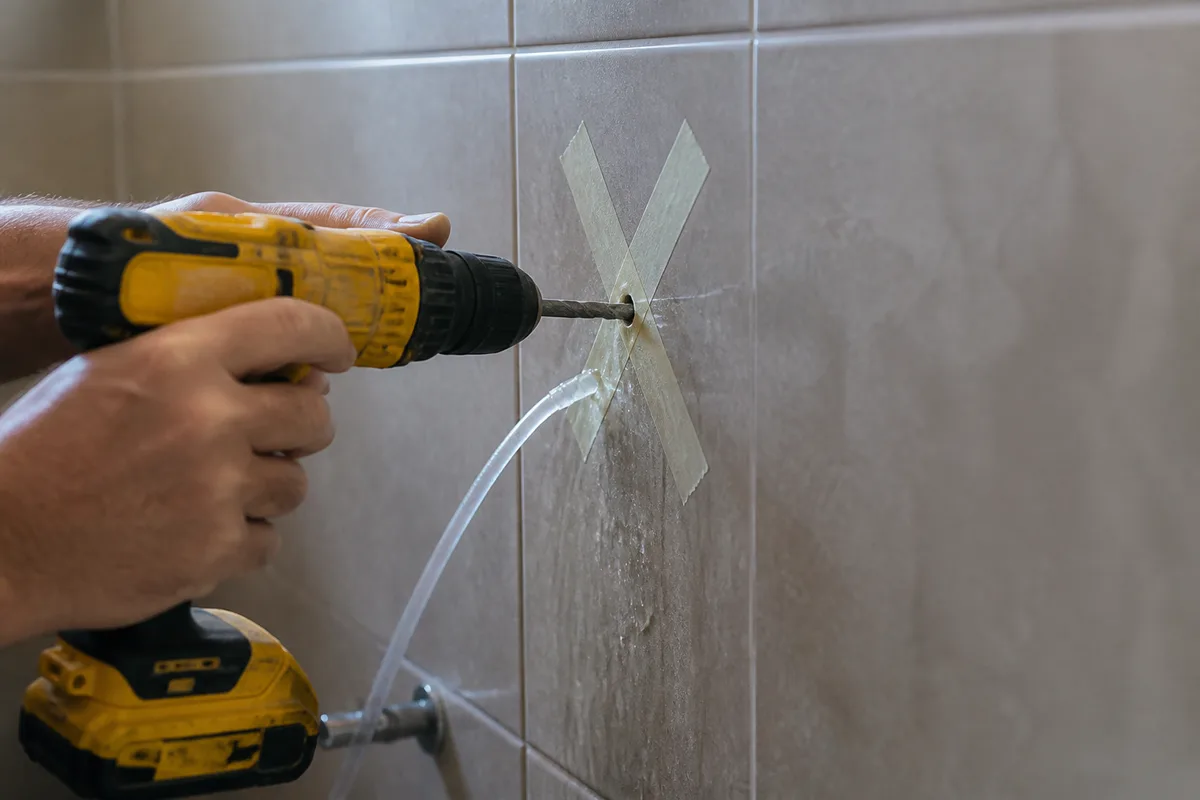
- Stick two strips of adhesive tape in a cross over the mark.
- Transfer the center of the hole onto the tape if the marking becomes difficult to see.
- Check once more the distance to the edges and the probable absence of embedded networks.
The adhesive tape creates a more gripping surface for the tip and limits slipping on the glaze. It does not replace controlled pressure: if the drill bit is tilted or if the drill is pushed abruptly, the tile can still chip.
How to drill tile without cracking: the steps
The method consists of first penetrating the hard surface of the tile, then adapting the tool to the substrate behind. Never force to speed up the operation: the noise, heat, and resistance felt provide useful indications on the progress of the drilling.
Step 1: adjust the drill and position the bit
Install the bit suitable for the diameter of the fixing, select the simple rotation mode and completely disable percussion. Place the tip at a right angle to the tile, without pressing hard before the bit is well centered.
For faience, a speed of about 300 to 500 rpm is a cautious order of magnitude. If the bit slips or the drill vibrates, stop and correct the angle rather than increasing the pressure.
Step 2: drill the tile surface without percussion
Start at a low speed while maintaining light and constant pressure. Advance the bit without lateral movement, as the edge of the tool could enlarge the hole and exert concentrated effort on the glaze.
Percussion must remain disabled as long as the bit is passing through the tile: vibrations can cause microcracks and chipping.
When the shiny layer is penetrated, the resistance usually changes. Then remove any debris around the hole and check that the diameter obtained corresponds to the intended fixing.
Step 3: cool the bit and monitor progress
Stop the drill regularly to cool the bit with a little water, without pouring liquid on an unprotected machine or on an electrical outlet. For porcelain stoneware, water cooling is essential to limit overheating and preserve the diamond tool.
A bit that changes color strongly, smokes, or becomes hot must be rested immediately. Work in short sequences and clean the area to distinguish dust from any possible tile chip.
Step 4: Drill through the substrate behind the tile
After drilling through the tile, adapt the drill bit to the wall behind: a concrete drill bit for a mineral substrate, a metal drill bit if necessary, or a specific tool for a partition wall. Percussion may only be used after passing through the tile, and only if the substrate and the tool manufacturer allow it.
Stay attentive to the depth. A hole that is too deep can reach a pipe or cable, while a hole that is too shallow will not allow the anchor to work properly.
Step 5: Insert the anchor and the fastener
Clean out the hole, insert the anchor without forcing it, and choose the screw corresponding to its model. In drywall behind the tile, an expansion anchor like a Molly bolt may be suitable for certain loads; in a solid wall, the anchor must be designed for masonry.
The final resistance depends on the substrate, the anchoring depth, the screw diameter, and the actual applied weight. For a hanging cabinet, a heavy shower bar, or a dynamic load, check the fastening instructions and seek professional advice if in doubt.
What mistakes cause tile cracking?
Cracks often appear at the start, when the drill bit slips, overheats, or is subjected to excessive force. They can also be related to a poorly glued tile, insufficient distance from the edge, or a fastener that later exerts excessive tension.
- Activating percussion from the start: vibrations directly hit the tile and can create microcracks.
- Using a concrete or metal drill bit: its geometry is not designed for enamel and increases the risk of slipping.
- Pressing hard on the drill: excessive pressure weakens the tile structure instead of properly speeding up drilling.
- Drilling too close to an edge: stresses concentrate on an already less resistant area.
- Drilling in a narrow joint: if the joint is less than 5 mm, the drill bit can touch neighboring tiles and cause chipping.
Do not try to mask abnormal resistance by increasing speed. A pause, tool check, and inspection of the tile condition often prevent more costly repairs.
Which drill bit to choose according to the type of tile?
Wall faience is easier to drill than full-body porcelain stoneware, but both require a start without percussion. Natural stone, marble, and very hard tiles demand more skill, rigorous cooling, and sometimes a water-cooled core drill on a column.
How to drill faience or wall tile?
To drill faience, use a tungsten carbide-tipped drill bit and work at a slow speed. Adhesive tape helps grip the glazed surface, especially for a small hole intended for a light shelf or a wall accessory.
Once the faience is drilled through, you do not necessarily keep the same drill bit for the substrate. The wall behind may require a different anchor and tool.
How to drill porcelain stoneware or porcelain?
Porcelain stoneware is denser and harder; a diamond drill bit is therefore necessary. Use a moderate speed, generally between 500 and 800 rpm depending on the diameter and manufacturer recommendations, with regular water cooling.
For a very hard tile, patience replaces force: the tool must cut progressively, without shock or excessive heating.
For a large diameter hole, choose a diamond hole saw. Keep it perfectly perpendicular and water the area according to the accessory instructions; a cheap hole saw may have a limited lifespan, sometimes only a few uses.
What to do with a mosaic, marble, or fragile tile?
A mosaic requires precisely locating the tile to be drilled and avoiding areas near edges. Marble and natural stones may have veins or internal tensions invisible to the eye: testing on a scrap of the same material is preferable before any definitive intervention.
If the fastener is heavy, the tile is expensive, or you need to make several holes, hiring a professional equipped with a water-cooled core drill reduces the risk of damage. Saving on tools is not a guarantee of overall savings.
Should you drill the tile before or after installation?
Drilling before installation is easier to control because the tile rests flat on a board that absorbs some of the vibrations. Drilling after installation is still common to add an accessory, but it requires checking the wall, the networks, and the quality of the adhesive.
When the countertop or covering still needs to be installed, coordinate the openings with other work. For a bathroom project, also consult the precautions related to installing a walk-in shower, especially around the networks and waterproofing.
What to do if the tile cracks or chips?
Stop drilling immediately and do not tighten the fixture in a cracked tile. A small peripheral chip can sometimes be hidden by a rosette or washer, but a crack that spreads usually requires replacing the tile or calling a professional.
Do not drill through a crack to “finish” it. Remove the dust, temporarily stabilize the area if necessary, and look for the cause: excessive pressure, inappropriate drill bit, hollow tile, hole too close to the edge, or overtightening.
What alternatives to drilling should be chosen?
For a light and accessible object, an adhesive fastener designed for humid areas can avoid drilling, but its actual load capacity and durability must be checked on the instructions. This solution is not automatically suitable for furniture, a grab bar, or equipment subjected to repeated stress.
If drilling is essential, move the fixture if possible to an area further from the edge or to a sufficiently wide joint, without weakening neighboring tiles. For other renovation operations, preparing the substrate also remains crucial, as in the installation of a linoleum covering.
Key takeaways
- 🔩 Choose a carbide drill bit for earthenware and a diamond drill bit for porcelain stoneware.
- 📍 Mark the spot, apply adhesive tape, and keep at least 2 cm from the edge.
- ⚙️ Drill without percussion, at low speed, with steady and moderate pressure.
- 💦 Cool the drill bit regularly, especially when drilling porcelain stoneware.
- 🚧 Check embedded networks and adapt the anchor to the support behind the tile.
Frequently Asked Questions
Can you drill tile with a regular drill?
Yes, a regular drill with adjustable speed can be suitable for a small hole if the percussion is turned off. It must be equipped with a drill bit suitable for tile and used perpendicular to the surface.
Is it always necessary to use water when drilling tile?
Water cooling is particularly important for porcelain stoneware and diamond drill bits. For a small earthenware tile, frequent breaks can limit heat, but you must follow the manufacturer’s instructions and protect the drill from any splashes.
Can you drill near a tile joint?
It is better to avoid a narrow joint less than 5 mm, as the drill bit may touch neighboring tiles. If the joint is wide enough and the location is suitable for the fixture, drilling must remain perfectly centered and gradual.
Which drill bit should be chosen for porcelain stoneware?
Use a diamond drill bit designed for porcelain stoneware, with moderate speed and water cooling. An earthenware or regular drill bit may not penetrate this very dense material properly.
Can percussion be used on tile?
No, percussion must be turned off while passing through the tile. It may possibly be considered afterward for certain mineral supports, if the anchor, drill, and manufacturer’s instructions allow it.
Useful sources to consult
- Bricomarché: choice of drill bit, adhesive tape, and drilling method.
- Habitatpresto: adapting the anchor to the support located behind the tile.
- Guedo Outillage: marking, protection, and usage precautions.