A tile that is coming loose may simply concern a poorly glued tile, but it can also reveal an uneven substrate, infiltration, or movements of the screed. The hollow sound, the tile that moves, cracking joints, and the lifting of several tiles are signs to observe before any repair.
This guide helps distinguish a localized detachment from a more serious disorder. You will find possible causes, a diagnostic method, steps to repair a loose tile, the limits of a personal intervention, budget guidelines, and situations that justify the intervention of a professional.
In brief
- 🔎 A tile that sounds hollow can indicate a void or loss of adhesion under the tile.
- 🧱 Re-gluing is only durable if the substrate is sound, clean, dry, and sufficiently stable.
- 💧 Infiltration, a significant crack, a floor that flexes, or extensive detachment should not be masked by a simple local repair.
- 🛠️ Glue injection may be suitable for some partial detachments, whereas a fully detached tile generally needs to be removed and then reinstalled.
Identifying signs of a loose tile
Detachment does not always manifest as an immediately lifted tile. It sometimes begins with a partial loss of adhesion, imperceptible to the eye, then evolves with temperature variations, humidity, or daily stresses.
Visible and audible symptoms
A tile that moves under weight or slight pressure is an important clue. The sound produced by gently tapping its surface with the handle of a tool can also change: a hollow sound often suggests the presence of a void under the tile, although this alone does not allow determining the exact cause.
Also observe the elements around the affected area:
- cracks crossing the tile or following the screed joints;
- joints that crumble, open, or show signs of moisture;
- bulging, lifted, or displaced tiles;
- detachment progressing gradually;
- stains, efflorescences, or odors suggesting infiltration.
A tile that sounds hollow is a diagnostic signal, not sufficient proof to choose a repair method.
Check if the problem is localized or generalized
Count the affected tiles and note their position. A single loose tile in the middle of an intact surface may correspond to a local bonding defect. Several aligned tiles, an entire area that sounds hollow, or lifting near a wall point rather to a problem with the substrate, joints, or expansion.
Do not force a tile that lifts strongly. Its removal may reveal a screed crack, persistent moisture, or a crumbly substrate. In a bathroom, kitchen, terrace, or balcony, searching for infiltration must precede the choice of glue.
Why is the tile coming loose?
The causes of tile detachment are often related to adhesion between the substrate, the glue, and the tile. An uneven or dusty substrate, poorly chosen glue, defective joints, and building movements can act separately or simultaneously.
Poor substrate preparation
Glue adheres poorly on a screed covered with dust, laitance, plaster, paint, or greasy residues. A damp, crumbly, or insufficiently flat substrate can also create areas without real contact under the tile.
Flatness must be checked before installation, especially for large formats. A screed that cracks, settles, or remains too damp can transmit its movements to the covering. Drying time depends on the nature and thickness of the screed; the reference of at least 21 days is often cited for certain cement screeds before tiling, but the specifications of the system used and the manufacturer must be verified.
Inappropriate glue or installation method
Tile glue is chosen according to the substrate, format, water exposure, outdoor use, and foreseeable movements. Poor application can be just as problematic: irregular thickness, exceeded open time, insufficiently glued substrate, or poorly pressed tile.
For large tiles, double bonding involves applying adhesive both on the substrate and on the back of the tile to improve contact. The size threshold and the exact method must be confirmed in the product classification, its technical data sheet, and the applicable regulations, particularly those associated with NF DTU 52.2.
Missing, degraded, or poorly positioned joints
Joints are not only meant to improve the appearance of the surface. Peripheral joints and expansion joints help absorb certain movements; if they are missing, clogged with adhesive, or replaced by a rigid material, stresses can concentrate in the tiles.
As a technical reference often associated with NF DTU 52.1, movement joints are mentioned every 40 m² indoors and every 20 m² outdoors. The actual configuration, the nature of the substrate, and the installation system may require special arrangements: therefore, the technical document corresponding to the site must be checked.
Moisture and infiltrations
An infiltration under the tile can come from a degraded joint, a pipe, a shower, a terrace, or a waterproofing defect. Moisture weakens certain substrates and can promote loss of adhesion, but simply replacing a joint does not fix a leak located behind the covering.
In a wet room, look for traces that appear after using the shower or a sink. On a terrace, examine the drains, upstands, and areas where water stagnates. If the substrate remains damp, re-laying the tile is likely to fail quickly.
Substrate movements and temperature variations
A screed that cracks, an unstable wooden floor, or a slab subjected to thermal variations can exert stresses on the tiling. Outdoors, frost, thaw, and temperature differences increase the risk. A heated floor also requires a progressive heating-up in accordance with the manufacturer’s and installation system’s instructions.
Repairing the tile without correcting the substrate movement often means treating the symptom rather than the cause of the detachment.
How to diagnose a tile that is detaching?
Start by delimiting the affected area, then examine the sound, movements, joints, and the condition of the accessible substrate. This check allows you to choose between a local repair and a more thorough inspection, but it does not replace an expert assessment when a structure or infiltration is involved.
A simple verification method
- Locate the area: mark the tiles that move or sound hollow with removable tape.
- Check the joints: look for cracks, powdery parts, openings, and water stains.
- Observe alignments: check if the cracks follow the screed joints or a room boundary.
- Examine the surroundings: look at thresholds, walls, corners, drains, and heated areas.
- Decide cautiously: limit the intervention to the tile if the defect is isolated and the substrate seems sound; otherwise, have the area inspected.
| Observed sign | Possible cause | Prudent action |
|---|---|---|
| Only one tile moves | Local adhesion defect | Controlled removal and substrate examination |
| Several tiles sound hollow | Insufficient bonding or irregular substrate | Map the area before repairing |
| Cracks and lifting | Screed movement or lack of suitable joint | Avoid simple re-bonding and request technical advice |
| Persistent moisture or odor | Infiltration or damp substrate | Locate and eliminate the source of water |
| Detachment on terrace | Weather, water, frost, or substrate movement | Check waterproofing and drainage slope |
A sound test neither measures the bonding strength nor the moisture content of the substrate. It is used to detect an anomaly and decide where to continue the examination, not to validate a repair on its own.
How to permanently repair a detached tile?
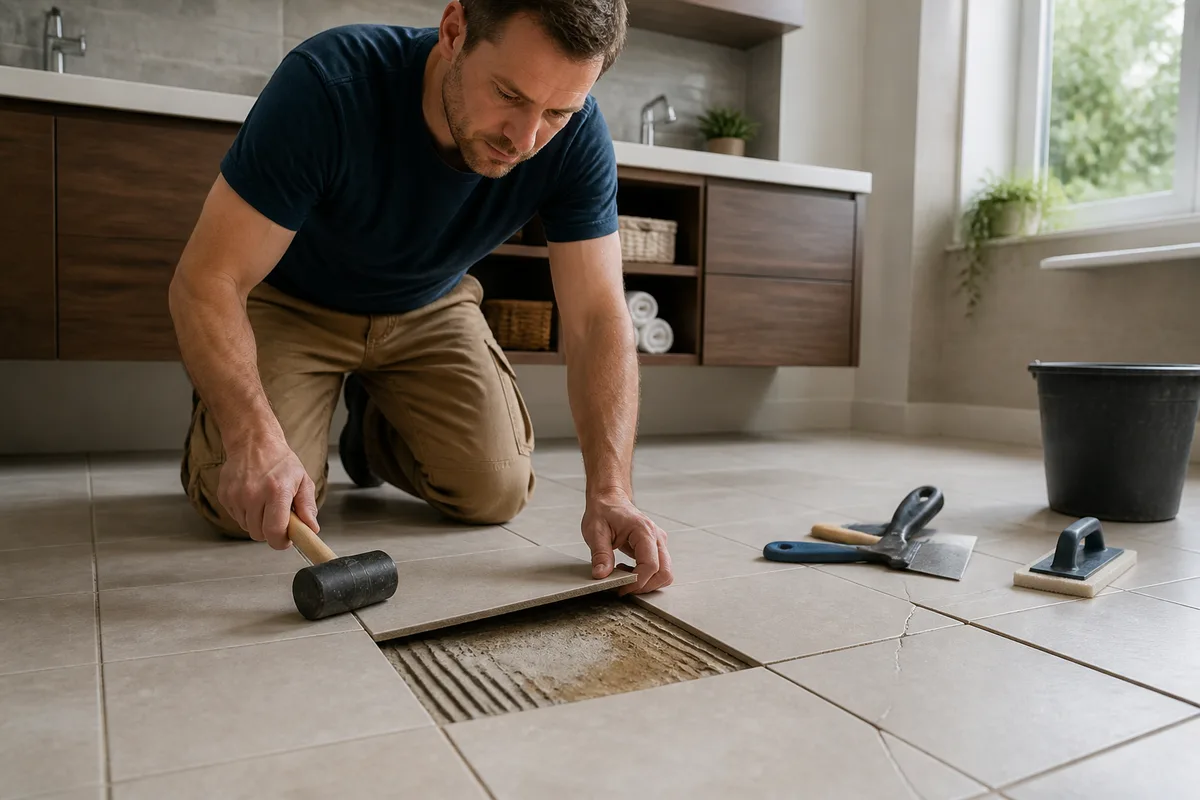
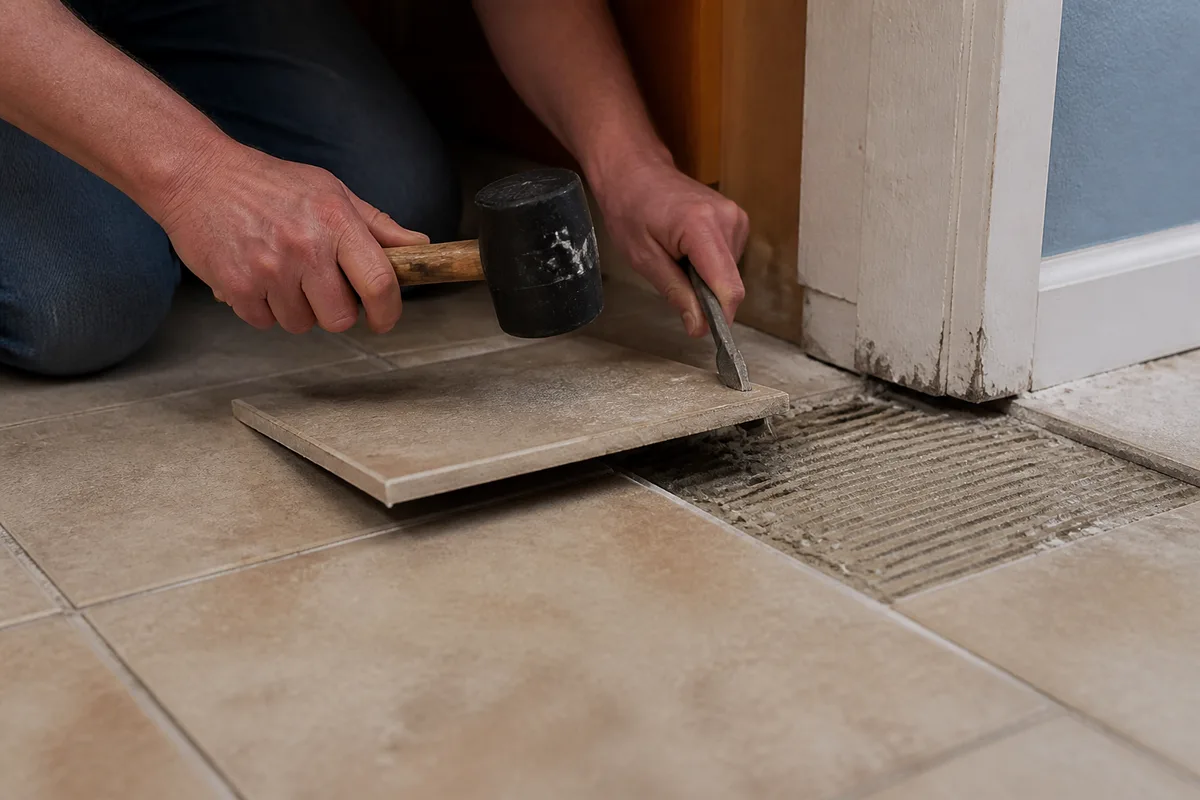
To repair a detached tile, you must first choose between injecting adhesive under a tile still in place and completely removing it. The first option can limit damage in the case of partial detachment; the second is generally more suitable when the tile moves significantly, the adhesive is powdery, or the substrate needs to be redone.
Step 1: Prepare the materials and secure the area
Plan to use safety glasses, gloves, a mallet, a fine chisel or removal tool, a scraper, a vacuum cleaner, a compatible adhesive, a notched spatula, and spacers if necessary. Protect furniture and keep children away from the work area, as a broken tile produces sharp edges.
The adhesive and grout must be compatible with the substrate and environment. For a bathroom, terrace, underfloor heating, or large format, the manufacturer’s label and technical data sheet are essential; a product marketed as “universal” does not exempt you from this verification.
Step 2: Remove the tile without damaging neighboring ones
First remove the grout around the tile to separate its edges. If the tile is already very unstable, lift it carefully. When it resists, break it gradually from the center towards the edges, without striking the neighboring tiles directly.
This step is more delicate on a wall tile, large format covering, or a surface equipped with underfloor heating. Do not dig deeply into the screed and do not drill without knowing the possible presence of networks.
Step 3: Clean and inspect the substrate
Remove adhesive residues until you obtain a stable surface. Carefully vacuum the dust, then check for flatness, cohesion, and absence of abnormal moisture. A painted, crumbly, or damp substrate must be treated with an appropriate method before any reinstallation.
If the screed shows an active crack, crumbles, or if a moisture odor persists, stop the local work. A durable repair then requires a substrate diagnosis, not a new layer of adhesive.
Step 4: Re-glue the tile properly
Prepare the adhesive according to the manufacturer’s instructions, without altering the indicated proportions. Spread it with a suitable spatula, position the tile respecting the existing joints, then apply even pressure. The tile must be at the same level as its neighbors without being forced against a wall or baseboard.
The open time, waiting time before grouting, and duration before reopening vary depending on the product and site conditions. **Respecting these times is a condition for success, not a formality to shorten to finish faster.**
Step 5: Regrout after drying
When the adhesive has sufficiently hardened, apply grout with a product suitable for the width and exposure of the area. Peripheral joints and movement joints must not be rigidly filled if they are designed to accommodate coating movements.
An epoxy resin may be relevant in some highly stressed or water-exposed environments, but it requires precise application and does not correct a substrate defect. It should not be chosen solely because it is presented as more resistant.
When is adhesive injection feasible?
Injection under a tile still in place can be considered when the detachment is partial, the tile is not cracked, and the substrate shows no moisture or identified movement. This technique sometimes avoids removal, but it is not suitable for a broken tile, a large void, or a crumbly substrate.
The compatibility of the injected resin or adhesive with the tile and substrate must be verified. A poorly executed injection can leave voids, stain the joints, or trap moisture; it is therefore not a universal solution.
Which solution to choose depending on the type of room?
The same defect is not treated the same way in a bedroom, a shower, or a terrace. Water, thermal variations, loads, and the nature of the substrate determine the level of preparation needed and the limits of a local repair.
| Situation | Possible repair | Point of caution |
|---|---|---|
| Dry interior room | Removal and reinstallation of an isolated tile | Check flatness and adhesive residues |
| Bathroom or kitchen | Local repair after moisture investigation | Do not cover untreated infiltration |
| Terrace or balcony | Waterproofing and drainage diagnosis | Frost and water can make local repair insufficient |
| Wooden floor | Substrate repair before reinstallation | A floor that flexes will continue to stress the tiles |
| Underfloor heating | Product and procedure compatible with heating | Respect the prescribed progressive heating-up |
In a wet room, repairing a tile can be part of a broader waterproofing check. Defects around a walk-in shower deserve special attention; the preparation and waterproofing principles are also discussed in this guide on installing a walk-in shower.
If the covering is generally degraded and complete removal is considered, also compare the available renovation solutions. In some dry rooms, laying linoleum can be an alternative, but it does not solve a moisture problem or an unstable substrate.
What alternatives exist between re-gluing and complete refurbishment?
The choice is not limited to “putting on more adhesive” or redoing the entire room. A localized repair, an injection, or a partial repair can be suitable for different cases, while a generalized defect often requires treating a larger surface.
| Option | For which case | Main limitation |
|---|---|---|
| Injection | Partial detachment without broken tile | Does not fix moisture or a moving substrate |
| Removal and reinstallation | Isolated tile that moves or sounds hollow | The tile may break during removal |
| Partial repair | Several affected tiles with locally deficient substrate | Risk of color or level difference |
| Complete refurbishment | Extended detachment, cracks, or degraded substrate | Longer project and higher budget |
For a very localized detachment, the cost may be limited to consumables and replacing one tile. As a purely indicative example, a private individual can expect a few tens of euros of materials for an isolated repair, while a professional intervention with travel, removal, and reinstallation can reach several hundred euros depending on access and complexity.
These amounts do not constitute an official rate or a personalized estimate. The tile repair price depends notably on the surface area, removal, tile availability, substrate condition, waterproofing, and finishes to be redone.
What mistakes prevent a lasting repair?
Repairs that fail often reproduce the initial cause. New adhesive cannot stabilize a cracked screed, dry out an infiltration, or replace a missing movement joint.
- Gluing over dust: residues prevent contact between the glue and the surface. You need to scrape, vacuum, and check cohesion before reapplying.
- Installing on a damp surface: water can compromise adhesion and mask a leak. The source of the moisture must be identified before closing the surface.
- Using glue without checking its compatibility: the substrate, size, outdoor conditions, and underfloor heating influence the choice of product.
- Removing or rigidly filling joints: movements are then transferred to the tiles and can cause cracks or lifting.
- Repairing only the visible tile: if several neighboring tiles sound hollow, the defect may extend well beyond the lifted area.
Surface preparation often determines the durability of the repair more than the amount of glue used.
When should you call a professional?
A professional is recommended when the detachment is extensive, associated with a crack, located on a heated floor, or related to a possible infiltration. You should also avoid continuing alone if the substrate flexes, if the screed crumbles, or if the covering suddenly lifts.
Risk situations
- detachment of several square meters;
- exterior tiling that detaches or lifts;
- leak, mold, persistent moisture, or water damage;
- through crack in the screed or substrate;
- unstable wooden floor or underfloor heating;
- electrical, hydraulic, or heating networks that may be near the area.
A craftsman can check the cohesion of the substrate, the extent of the detachment, the joints, moisture, and the compatibility of the installation system. In case of recent work, keep invoices, photograph the defects, and send a written complaint to the company before having the area demolished.
Warranties and recourse after work
In France, the perfect completion guarantee covers defects reported during the year following the acceptance of the work. The ten-year guarantee concerns damage significant enough to compromise the structural integrity of the building or make it unfit for use; its application to tile detachment depends on the extent and consequences of the defect.
These guarantees are not automatically inferred from the appearance of the tiles alone. To know the appropriate recourse, consult the information on Service-Public.fr on warranties after work and, if necessary, seek professional advice or an independent expert opinion.
How to prevent tiles from detaching again?
Prevention is based on rigorous preparation, compatible materials, and consideration of building movements. The rules of NF DTU 52.2 notably concern glued installation and must be supplemented by the manufacturer’s instructions and the characteristics of the site.
Before installation
The substrate must be clean, stable, sufficiently dry, and suitable for the covering. Check flatness, treat cracks, respect the drying time of the screed, and plan necessary joints. On an old surface, a primer or specific preparation may be required, but it does not transform a friable substrate into a sound one.
During installation
Respect the preparation of the glue, its open time, and the indicated spreading method. For large formats, double spreading is commonly required beyond certain thresholds, including the 30 × 30 cm mentioned in the cited installation instructions; always verify the applicable rule for the product and site.
After installation
Avoid loads and traffic before the recommended delay. On a heated floor, reheating must follow the manufacturer’s procedure and the installation system, without sudden increases. Then monitor the joints, cracks, and the first tiles that sound hollow to intervene before more significant lifting occurs.
Useful Sources to Consult
- NF DTU 52.1 : provisions relating to sealed installation and joints; to be consulted in its version applicable to the site.
- NF DTU 52.2 : rules for the installation of bonded ceramic coverings; useful for the substrate, bonding, and large formats.
- Adhesive technical data sheet : accepted substrate, format, indoor or outdoor, open time and delay before grouting.
- Service-Public.fr : guarantees applicable after work and procedures in case of defects.
The DTUs are normative technical documents that may require payment for access. In case of contradiction between a general advice and the notice of the system used, the technical data sheet, professional rules, and the opinion of a qualified professional should guide the decision.
Key Points to Remember
- 🔎 A tile that moves or sounds hollow must be examined before any injection or reinstallation.
- 🧱 Durable repair starts with a clean, dry, flat, and stable substrate.
- 💧 An infiltration, a crack, or extensive detachment requires treating the cause before the covering.
- 🛠️ Removal and reinstallation is better suited for a fully detached tile; injection remains a limited solution.
- 📄 After recent work, document defects and check guarantees before undertaking demolition.
Frequently Asked Questions
Can a tile be re-glued without removing it?
Yes, injection under the tile can be considered when the detachment is partial, the tile is intact, and the substrate is sound. This technique is not suitable for infiltration, friable substrate, or extensive voids.
Why does a tile sound hollow?
A hollow sound can indicate insufficient adhesion or a void under the tile. It may result from poor preparation, incomplete bonding, or substrate movement, but only an examination after removal can confirm the cause.
How much does it cost to repair a detached tile?
An isolated repair may cost a few dozen euros in materials if you do it yourself. With a professional, the cost can reach a few hundred euros depending on travel, removal, substrate condition, and finishing; a quote is necessary for accurate pricing.
Is it necessary to redo the entire room?
No, not systematically. A single detached tile on a stable substrate can be replaced locally, while extensive detachment, cracks, or persistent moisture may justify a zone repair or complete refurbishment.
What to do if the tile detaches after recent work?
Photograph the defects, keep the invoices, and report them in writing to the company. Then check the perfect completion guarantee or, depending on the severity and consequences, the possible ten-year guarantee; avoid destroying evidence before an official report.